I've not been posting very regularly since the start of the school year. That will change once my class starts doing Java. Whenever I teach Java I get lots of material for this blog. One question can make me realize how non-obvious a whole range of things are to new programmers.
Right now the class is working on developing web pages, you can see their first efforts, severely constrained by the available class time at http://colfax.webhosting-for-free.com/. CSS is one of the things we're working on, and this dovetails right into Java since you can use CSS with Java to style your user interfaces.
There's a nice tutorial with sample code showing how it works at Swing and CSS by Joshua Marinacci.
Monday, October 27, 2008
Monday, September 8, 2008
Making Java Signatures Simple
Methods have names. For example,
Unfortunately, the word "name" doesn't have a technical meaning. And even if we gave it one, it might lead to misunderstanding when we're switching back between technical terms and nontechnical ones. So there's a technical term for names of methods in Java: signatures.
The way we've used "name" above refers to the same thing as the Java term "simple signature." The simple signature of a method is its text name, ignoring everything in the parentheses, its return type, and so on. So
The full signature, which is what we mean when we just say "signature", includes the full typing of the method and its parameters. So the full signature includes the type or class of everything in the parentheses of the method as well as the name of the method. This is what Java looks at when it's compiling.
That's why you get a runtime error if you do the following:
The Java compiler will compile this just fine. It will create a .class file with a method that's got the signature main().
Then when you try to run it, the JRE will look for a method with the signature
You've got a method whose signature is main(String) not main(String[]), that is, its parameter is a String, not an array of Strings.
An example of methods that have the same name but different signatures are the constructor methods for the Color class. You can create a new Color in any of several different ways:
and so on.
In the first we give the constructor three different integer values for the red, green, and blue values of the new Color. In the second we give four integer values--the same three as before plus an alpha (transparency) value. Or we can pass one integer value that has all three of the red, green, and blue values in one number. Or we can pass separate red, green, and blue values as floating point numbers rather than integers. There are more ways, yet.
While all these constructors have the same name, or simple signature ("Color"), they each have a different signature based on their parameter list. That way Java is able to tell them apart, and know what value types it should expect to work with. That way if you give two values as integers, and a third as a floating point value Java will realize it doesn't know how to deal with that and recognize an error in the code.
That means when you're calling a method, and the compiler spits it out and says it's not found you need to make sure you've:
System.out.println() is usually called "print line", though we'd probably say "system-out-print line" for it as I've written it here.Unfortunately, the word "name" doesn't have a technical meaning. And even if we gave it one, it might lead to misunderstanding when we're switching back between technical terms and nontechnical ones. So there's a technical term for names of methods in Java: signatures.
The way we've used "name" above refers to the same thing as the Java term "simple signature." The simple signature of a method is its text name, ignoring everything in the parentheses, its return type, and so on. So
println() and println(String) have the same simple signature.The full signature, which is what we mean when we just say "signature", includes the full typing of the method and its parameters. So the full signature includes the type or class of everything in the parentheses of the method as well as the name of the method. This is what Java looks at when it's compiling.
That's why you get a runtime error if you do the following:
public static void main(){
...
The Java compiler will compile this just fine. It will create a .class file with a method that's got the signature main().
Then when you try to run it, the JRE will look for a method with the signature
main(String[]), that is, a method with the text name main followed by a parameter list that includes an array of strings. If the array of strings isn't there, it doesn't match the signature that the JRE is looking for. So you get an error when you try to run your program. This will also happen if you do this:public static void main(String arg){
...You've got a method whose signature is main(String) not main(String[]), that is, its parameter is a String, not an array of Strings.
An example of methods that have the same name but different signatures are the constructor methods for the Color class. You can create a new Color in any of several different ways:
Color(int r, g, b)
Color(int r, g, b, a)
Color(int rgb)
Color(float r, g, b)
and so on.
In the first we give the constructor three different integer values for the red, green, and blue values of the new Color. In the second we give four integer values--the same three as before plus an alpha (transparency) value. Or we can pass one integer value that has all three of the red, green, and blue values in one number. Or we can pass separate red, green, and blue values as floating point numbers rather than integers. There are more ways, yet.
While all these constructors have the same name, or simple signature ("Color"), they each have a different signature based on their parameter list. That way Java is able to tell them apart, and know what value types it should expect to work with. That way if you give two values as integers, and a third as a floating point value Java will realize it doesn't know how to deal with that and recognize an error in the code.
That means when you're calling a method, and the compiler spits it out and says it's not found you need to make sure you've:
- spelled the name right,
- got the right type and number of parameters,
- and imported the appropriate packages and classes.

Friday, September 5, 2008
Java's Documentation: A Closer Look
I started discussing the place to look up Java's classes and methods in Java's Reference Manual and the place to look up the language's syntax and elements in The Java Language Manual. Here I'm going to take a deeper look at the documentation of Java's classes, interfaces, and so on in the the Java API Reference.
At first glance the page that's presented to you by the API reference can be overwhelming. Too much information!
First let's look at what's in each panel. If you don't have the API reference open in another tab or window of your browser, open it now. I'll be referring to what you see. The link is the Java API Reference. Bookmark it. Put it on your bookmark bar. Don't tattoo it on your forearm, though--there'll be a new URL when a new version of Java hits the streets and you'd be really embarassed to walk around with an old URL tattooed on your arm, wouldn't you? Writing it on a sticky and putting it on your monitor's bezel is probably good enough.
In the upper left frame, we have the list of packages. So far so good. If you know what package has what you're looking for in it, you can reduce the stuff listed elsewhere a lot by clicking on the name of the package. For example, JFrame is in javax.swing. If you click on javax.swing in the upper left frame, you'll see a change in the display. Now only the classes, interfaces, and enums and exceptions defined in javax.swing are listed in the lower left frame. It's a much smaller list to scroll through. If you don't know the package you're looking for, then you'll just have to go through the long list, which is in alphabetical order.
In the upper left frame, click on "All Classes" at the top of the list to list all the classes, interfaces, enums, and exceptions in the API again.
Once you find your class on the lower left, you'll get its documentation in the main panel on the right. This can be overwhelming as well. Since we've already talked about JFrame, let's look at it. Click on JFrame in the lower left panel. You can select javax.swing in the upper left panel first to make selecting JFrame easier if you wish.
In the main window, you'll see the big title "Class JFrame". Immediately above that in small type is the package it is in. If you didn't already know that JFrame is in javax.swing, now you would know. Remember the package for when you think you're going to look something up again later. Or, if you want to include a class and don't know what package to
Beneath Class JFrame you'll see a list of other classes with little stairsteps leading down from one to another. These are the parent classes of JFrame, from the most basic object class in Java,
You can see the documentation for any of them by simply clicking on the class's name. But don't just yet, we're going to look at more of JFrame's documentation first.
Next down the page is the list of interfaces that JFrame implements. This means that JFrame has the methods implemented in it that these interfaces call for. There's a lot more to an interface than this, but that's a subject for another time. In essence, JFrame inherits the functions of these interfaces by implementing the methods they define.
Below the line, we have a text description of JFrame headed by a pseudocode definition of JFrame. Some of these text descriptions in Java's API Specification are very useful, others are less useful. The one for JFrame is middle of the road. Like many descriptions, it comes in at the middle of the story, assuming that you have complete and perfect familiarity with some other part of Java that isn't what you're looking up here. This results in some look-ups turning into searches for the start of the story. You look up JFrame, it refers to Frame, then you go back to Window to understand what they're talking about in java.awt.Frame's documentation. Then you're reading all about java.awt.Component, and so on. Before you know it, you're looking at java.lang.Object and wondering what your original question was, and where all the time has gone.
So don't rely to heavily on these. Scan them, but if you're not getting what you want, keep moving down. Usually the later parts of the section are far more informative and direct. If there's some meta-information you're looking for on a class, check the related tutorial at Sun, or do a web search and look for a good intro or tutorial article. (You might even scroll down below my articles to where I keep a long index to my articles.)
I'm going to skip on down past the Nested Class Summary and list of nested classes inherited, too, and jump right into the Field Summary below them.
Fields are the variables and constants defined for the class. The first listed have been defined directly in this class. The listing tells you what they've been defined as, and their purpose. Following that is a list of ones inherited from each of the parent classes.
The Constructor Summary tells you what constructors are available for this class. If you were hoping for a JFrame constructor that lets you set it visible and give it a size right at the outset, you'll see you're out of luck. JFrame's constructors only allow you to define either or both of the JFrame's title and graphics configuration when it's instantiated (that is, when the Constructor makes a new one.) So you'll have to set the size and visibility later.
How you set size and visibility, and do a bunch of other things with a JFrame comes next. They're part of the Method Summary. First there's the list of methods defined in JFrame. These are the new methods that JFrame adds to its parents' methods. Each lists its type and name and parameter list along with a brief description. Following comes the long, long list of inherited methods. JFrames have all these methods, too, but their description lies in the document page for the class they were originally defined in. Click on their name to go there.
Following this come the detailed descriptions of JFrame's fields and methods. You could have gotten here the fast way by clicking on one of the field or method names in the summaries above. These are the real meat of the Java API specification. They tell you how to use the class methods, and what they do. Once you know them, the short description in the summary will usually be enough for you (if you need even that.)
Having the whole document hyperlinked makes it far more useful than a paper document would be. There'd just be too much page-flipping.
If you want to have a copy right on your own machine, you can download the entire thing. The PDF is available from Sun for Java 6, or you can get it for different versions from links on the Java SE reference page.
That way you don't have to be on the network all the time, or held hostage to the speed of your connection to look up something.
At first glance the page that's presented to you by the API reference can be overwhelming. Too much information!
First let's look at what's in each panel. If you don't have the API reference open in another tab or window of your browser, open it now. I'll be referring to what you see. The link is the Java API Reference. Bookmark it. Put it on your bookmark bar. Don't tattoo it on your forearm, though--there'll be a new URL when a new version of Java hits the streets and you'd be really embarassed to walk around with an old URL tattooed on your arm, wouldn't you? Writing it on a sticky and putting it on your monitor's bezel is probably good enough.
In the upper left frame, we have the list of packages. So far so good. If you know what package has what you're looking for in it, you can reduce the stuff listed elsewhere a lot by clicking on the name of the package. For example, JFrame is in javax.swing. If you click on javax.swing in the upper left frame, you'll see a change in the display. Now only the classes, interfaces, and enums and exceptions defined in javax.swing are listed in the lower left frame. It's a much smaller list to scroll through. If you don't know the package you're looking for, then you'll just have to go through the long list, which is in alphabetical order.
In the upper left frame, click on "All Classes" at the top of the list to list all the classes, interfaces, enums, and exceptions in the API again.
Once you find your class on the lower left, you'll get its documentation in the main panel on the right. This can be overwhelming as well. Since we've already talked about JFrame, let's look at it. Click on JFrame in the lower left panel. You can select javax.swing in the upper left panel first to make selecting JFrame easier if you wish.
In the main window, you'll see the big title "Class JFrame". Immediately above that in small type is the package it is in. If you didn't already know that JFrame is in javax.swing, now you would know. Remember the package for when you think you're going to look something up again later. Or, if you want to include a class and don't know what package to
import, this is a good way to find out.Beneath Class JFrame you'll see a list of other classes with little stairsteps leading down from one to another. These are the parent classes of JFrame, from the most basic object class in Java,
java.lang.Object to JFrame itself. JFrame inherits from all these classes. Every method and field that they have, JFrame has, too.You can see the documentation for any of them by simply clicking on the class's name. But don't just yet, we're going to look at more of JFrame's documentation first.
Next down the page is the list of interfaces that JFrame implements. This means that JFrame has the methods implemented in it that these interfaces call for. There's a lot more to an interface than this, but that's a subject for another time. In essence, JFrame inherits the functions of these interfaces by implementing the methods they define.
Below the line, we have a text description of JFrame headed by a pseudocode definition of JFrame. Some of these text descriptions in Java's API Specification are very useful, others are less useful. The one for JFrame is middle of the road. Like many descriptions, it comes in at the middle of the story, assuming that you have complete and perfect familiarity with some other part of Java that isn't what you're looking up here. This results in some look-ups turning into searches for the start of the story. You look up JFrame, it refers to Frame, then you go back to Window to understand what they're talking about in java.awt.Frame's documentation. Then you're reading all about java.awt.Component, and so on. Before you know it, you're looking at java.lang.Object and wondering what your original question was, and where all the time has gone.
So don't rely to heavily on these. Scan them, but if you're not getting what you want, keep moving down. Usually the later parts of the section are far more informative and direct. If there's some meta-information you're looking for on a class, check the related tutorial at Sun, or do a web search and look for a good intro or tutorial article. (You might even scroll down below my articles to where I keep a long index to my articles.)
I'm going to skip on down past the Nested Class Summary and list of nested classes inherited, too, and jump right into the Field Summary below them.
Fields are the variables and constants defined for the class. The first listed have been defined directly in this class. The listing tells you what they've been defined as, and their purpose. Following that is a list of ones inherited from each of the parent classes.
The Constructor Summary tells you what constructors are available for this class. If you were hoping for a JFrame constructor that lets you set it visible and give it a size right at the outset, you'll see you're out of luck. JFrame's constructors only allow you to define either or both of the JFrame's title and graphics configuration when it's instantiated (that is, when the Constructor makes a new one.) So you'll have to set the size and visibility later.
How you set size and visibility, and do a bunch of other things with a JFrame comes next. They're part of the Method Summary. First there's the list of methods defined in JFrame. These are the new methods that JFrame adds to its parents' methods. Each lists its type and name and parameter list along with a brief description. Following comes the long, long list of inherited methods. JFrames have all these methods, too, but their description lies in the document page for the class they were originally defined in. Click on their name to go there.
Following this come the detailed descriptions of JFrame's fields and methods. You could have gotten here the fast way by clicking on one of the field or method names in the summaries above. These are the real meat of the Java API specification. They tell you how to use the class methods, and what they do. Once you know them, the short description in the summary will usually be enough for you (if you need even that.)
Having the whole document hyperlinked makes it far more useful than a paper document would be. There'd just be too much page-flipping.
If you want to have a copy right on your own machine, you can download the entire thing. The PDF is available from Sun for Java 6, or you can get it for different versions from links on the Java SE reference page.
That way you don't have to be on the network all the time, or held hostage to the speed of your connection to look up something.
Monday, August 11, 2008
Simple Mouse Interaction in Java
Building on the basic graphics we've done in Very Basic Java Graphics--3 Examples and A Most Basic Graphics App we'll be adding mouse interaction in this example.
To add mouse interaction, we're taking advantage of an interface from the
Implementing the
This program lets you draw by clicking the mouse at various places in the MousePanel's drawing area, drawing a line from the prior click location (or from top left for the first click) to the location of the current click.
Here's a little challenge for you:
Change the program so that it doesn't draw a line from upper left on the first click, but instead draws a dot in the location of the first click. Later clicks will then draw lines from the prior click's location.
Hint: If you set the initial oldX and oldY values to a value that isn't in the visible MousePanel area, you can tell if there haven't been any prior clicks.
/* MousePanel.java

    This program adds the ability to respond to
    mouse events to the BasicPanel program.

    The mouse clicks are used to draw on the
    panel area using drawline instructions.

    mag-30Apr2008
*/

// Import the basic necessary classes.
import java.awt.*;
import java.awt.event.*;
import javax.swing.*;

public class MousePanel extends JPanel implements MouseListener{

    public MousePanel(){
        super();
        pointX=20;
        pointY=20;
        oldX=0;
        oldY=0;
        addMouseListener(this);
    }

    int pointX, pointY, oldX, oldY;

    public void paintComponent(Graphics g){
    // Draw a line from the prior mouse click to new one.
        g.drawLine(oldX,oldY,pointX,pointY);
    }

    public void mouseClicked(MouseEvent mouse){
    // Copy the last clicked location into the 'old' variables.
        oldX=pointX;
        oldY=pointY;
    // Get the location of the current mouse click.
        pointX = mouse.getX();
        pointY = mouse.getY();
    // Tell the panel that we need to redraw things.
        repaint();
    }

/* The following methods have to be here to comply
   with the MouseListener interface, but we don't
   use them, so their code blocks are empty. */
    public void mouseEntered(MouseEvent mouse){ }
    public void mouseExited(MouseEvent mouse){ }
    public void mousePressed(MouseEvent mouse){ }
    public void mouseReleased(MouseEvent mouse){ }

    public static void main(String arg[]){
        JFrame frame = new JFrame("MousePanel");
        frame.setDefaultCloseOperation(JFrame.EXIT_ON_CLOSE);
        frame.setSize(250,250);

        MousePanel panel = new MousePanel();
        frame.setContentPane(panel);
        frame.setVisible(true);
    }
}
To add mouse interaction, we're taking advantage of an interface from the
java.awt.events package called MouseListener. When we implement MouseListener as part of our JPanel class, then call addMouseListener(this) as part of our MousePanel() constructor, our program is "wired up" to the mouse, so that our MousePanel gets mouse events from the JVM.Implementing the
MouseListener interface requires that we implement all the methods called for by the interface. We only use MouseClicked() in this example, however, so it's the only one that has code in its code block.This program lets you draw by clicking the mouse at various places in the MousePanel's drawing area, drawing a line from the prior click location (or from top left for the first click) to the location of the current click.
Here's a little challenge for you:
Change the program so that it doesn't draw a line from upper left on the first click, but instead draws a dot in the location of the first click. Later clicks will then draw lines from the prior click's location.
Hint: If you set the initial oldX and oldY values to a value that isn't in the visible MousePanel area, you can tell if there haven't been any prior clicks.
Friday, August 8, 2008
Reference Types: Names and Objects
When we learned about primitive variables we learned that they are a way of storing a simple value, like a number or a true-false state. We give them a name, and whenever we want to get that value we use that name. Whenever we want to change the value that's stored, we set the name equal to the new value:
When we use objects, we're using a more complex kind of variable. We don't do it for the sake of complexity, but because adding some complexity here makes things a lot simpler elsewhere in our program. A lot simpler.
Object variables are called "reference types", the type is actually the class that the object belongs to. The difference between a reference variable and a primitive variable is that a primitive variable actually is a storage location in computer memory that holds the stored information. A reference variable is a name that names a specific type of information. It doesn't actually hold the information, it's just associated with an object that actually holds the information.
This why there's a two step process in creating a Java variable. The first step, declaration, sets up a name we're going to use for a particular type of object. The second step, initialization, associates that name with an object--creating a new object if necessary.
Let's say I'm talking to a friend. I say, "I'm going to get a hamster and call it Wilmot."
"That's nice," says the friend. "Can I see Wilmot?"
"I don't have him yet."
"What color is Wilmot?"
"I don't know, I don't have a hamster yet."
Then I go to the pet store and pick up a hamster. I call him Wilmot, put him in a cage and take him home. I've now initialized the name Wilmot I declared to my friend earlier to point to a specific hamster.
Now when my friend says "Can I see Wilmot?" I can show him a hamster, and say "This is Wilmot." When he wants to know the color, there is an object to get the color of.
In Java terms, if I had a Hamster class, I could declare a name like this:
I now have a name for a Hamster object, but no Hamster. I can initialize the reference variable by getting a new Hamster object using the class's constructor, Hamster():
Now I have a Hamster object associated with the name. The name references the Hamster object that's been created. Hence the term "reference variable".
Now, if I create a new name and make it point to the same Hamster object, it becomes a new name for the same object:
Now, if I make any changes to fluffy they also happen to wilmot. For example, if wilmot's size is 10cm, and I set fluffy's size to 12cm, then get wilmot's size it will be 12cm.
This is different from what happens with primitive variables. If I do the same thing with a pair of primitive variables like this:
Then the output will be:
With a primitive variable, when we set it equal to another primitive we get a copy of the value in that primitive's own storage. When we set a reference variable equal to another reference variable, we are now referring to the same object as the other reference variable. In pet terms, it's like giving our hamster a second name. We might call it wilmot or fluffy, but they're both the same hamster.
If we need to have each name apply to a different hamster, we need to go back to the pet store for another hamster. In Java, we need to use the constructor to get another Hamster object:
But what if we want it to act like a primitive object? What if we want a copy of wilmot to make changes to without affecting wilmot? Then we use a method of the object's class to create a new object that's a copy of that object. Usually this will be clone():
Now fluffy is a copy of wilmot, and we can make changes to fluffy without affecting wilmot. Note: whether a class has the clone() method varies from class to class. Normally, if the class implements the Clonable interface then it has a clone() method that works this way.
int value;     //Declare an integer variable named value.
value=100;     // Store the number 100 in value.
System.out.println(value);  // Print the number in value, "100"
value=20;     // Put 20 in value. Over-writes the 100.
count=value;     // Gets the number from value and puts
        // it in count.
        // Assumes 'count' was declared as an int before.
When we use objects, we're using a more complex kind of variable. We don't do it for the sake of complexity, but because adding some complexity here makes things a lot simpler elsewhere in our program. A lot simpler.
Object variables are called "reference types", the type is actually the class that the object belongs to. The difference between a reference variable and a primitive variable is that a primitive variable actually is a storage location in computer memory that holds the stored information. A reference variable is a name that names a specific type of information. It doesn't actually hold the information, it's just associated with an object that actually holds the information.
This why there's a two step process in creating a Java variable. The first step, declaration, sets up a name we're going to use for a particular type of object. The second step, initialization, associates that name with an object--creating a new object if necessary.
Let's say I'm talking to a friend. I say, "I'm going to get a hamster and call it Wilmot."
"That's nice," says the friend. "Can I see Wilmot?"
"I don't have him yet."
"What color is Wilmot?"
"I don't know, I don't have a hamster yet."
Then I go to the pet store and pick up a hamster. I call him Wilmot, put him in a cage and take him home. I've now initialized the name Wilmot I declared to my friend earlier to point to a specific hamster.
Now when my friend says "Can I see Wilmot?" I can show him a hamster, and say "This is Wilmot." When he wants to know the color, there is an object to get the color of.
In Java terms, if I had a Hamster class, I could declare a name like this:
Hamster wilmot;
I now have a name for a Hamster object, but no Hamster. I can initialize the reference variable by getting a new Hamster object using the class's constructor, Hamster():
wilmot=new Hamster();
Now I have a Hamster object associated with the name. The name references the Hamster object that's been created. Hence the term "reference variable".
Now, if I create a new name and make it point to the same Hamster object, it becomes a new name for the same object:
Hamster fluffy;
fluffy=wilmot;
Now, if I make any changes to fluffy they also happen to wilmot. For example, if wilmot's size is 10cm, and I set fluffy's size to 12cm, then get wilmot's size it will be 12cm.
This is different from what happens with primitive variables. If I do the same thing with a pair of primitive variables like this:
int value, count;
value=100;     // Initialize value to 100;
count=value;     // Set count equal to value.
count=count-20;     // Subtract 20 from count.
        // We could have said 'count-=20;', too.
System.out.println("value= " + value);     // Print value.
System.out.println("count= " + count);     // Print count.
Then the output will be:
value= 100
count= 80
With a primitive variable, when we set it equal to another primitive we get a copy of the value in that primitive's own storage. When we set a reference variable equal to another reference variable, we are now referring to the same object as the other reference variable. In pet terms, it's like giving our hamster a second name. We might call it wilmot or fluffy, but they're both the same hamster.
If we need to have each name apply to a different hamster, we need to go back to the pet store for another hamster. In Java, we need to use the constructor to get another Hamster object:
Hamster wilmot, fluffy;
wilmot=new Hamster();
fluffy=wilmot;     // fluffy and wilmot are now both names
    // for the same Hamster object. Anything we do to fluffy
    // will also apply to wilmot, and vice versa.
fluffy=new Hamster();
// Now fluffy applies to a different Hamster object.
// We can make changes to fluffy and
// they won't affect wilmot. We now have two
// Hamster objects, each with its own name
// to refer to it.
But what if we want it to act like a primitive object? What if we want a copy of wilmot to make changes to without affecting wilmot? Then we use a method of the object's class to create a new object that's a copy of that object. Usually this will be clone():
Hamster wilmot, fluffy;
wilmot=new Hamster();
fluffy=wilmot.clone();
Now fluffy is a copy of wilmot, and we can make changes to fluffy without affecting wilmot. Note: whether a class has the clone() method varies from class to class. Normally, if the class implements the Clonable interface then it has a clone() method that works this way.
Monday, August 4, 2008
Mini-Review: Beginning Programming with Java for Dummies by Barry Burd
Of the books currently available, this one is my favorite for teaching non-programmers the basics of programming. This is in spite of the fact that it goes against a few strongly-held opinions of mine. I have worked through the book myself, and had a student with no prior programming experience use the book for self-study. So the opinions here are based on my own experience as an instructor and the feedback I've gotten from the student.
The writing style of this book is fun and easy to read. This is always a big plus for books that teach a complex and unfamiliar subject. The material is also varied from chapter to chapter, meaning that you won't be going to sleep writing different kinds of loops for three straight chapters. Subjects are interleaved, for example, there is a section on using files that breaks up material on loops and iteration.
The start of the book is quite leisurely. This is valuable in a book for non-programmers, I feel. The pace of the book picks up as it goes, so don't be fooled into thinking the book is just a brief tutorial that's been padded out into book length. The early sections are also quick reads, and sections on installing Java can be scanned or skipped over as appropriate. The pages dedicated to installing the JDK are there for a good reason, though. My experience is that just getting the JDK installed and running is one of the biggest hurdles for non-programmers who want to learn Java.
The differences I have with this book are few, but significant. The first is that graphics are left until the very tail end of the book. As I've stated elsewhere, I'm a proponent of teaching graphics early. I feel they're a good motivator for new programmers, and they allow new programmers to visualize the effects of their program's flow control structures in a way that rows of numbers can't equal.
The second difference I have with this book's approach is the use of an integrated development environment (IDE) right from the start. I've also commented in a prior article why I think it's a good idea to at least be familiar with common command line operations before starting with the IDE. I feel that starting with an IDE right off glosses over some skills that are crucial to programmers at any skill level.
The third concern I have with the book is that it recommends the use of a Windows-only IDE for use with the book. Now, if this were a .Net book or something similarly tied to a single platform I wouldn't have any problem with this. But this is a Java book! Why not a good multiplatform IDE written in Java? It's not like there aren't any good choices. My student was working on a Mac, and was able to complete the work in the book with no problem using, primarily, Arachnophilia but also using BlueJ for the latter part of the book.
I would also be concerned that people seeing the recommendation of a platform-specific IDE early in the book would think that therefore the book itself contains a substantial measure of platform-specific content. It doesn't, but flipping through the start of the book isn't enough to make that clear.
The focus of the book is on the basics of programming. It does not dip heavily into object oriented programming. It simply uses Java and its facilities to teach introductory programming in much the same way as one might use C or Pascal for the same purpose. I don't yet consider this a problem, though Greenfoot may convince me that objects and classes should be right up front now. However, I feel that starting with this book and then moving on to other resources like Greenfoot and Head First Java to develop a better understanding of Java and object oriented programming is a perfectly acceptable way to learn.
Even with its problems, I consider this book to be the best on the market for a non-programmer. It does not go as deeply into Java as Beginning Programming in Java for the Absolute Beginner, but it's an easier read and overall I like the structure better even though it covers less.
Final Grade: 90%, A
Pros:
Easy to read.
Good pacing of material.
Doesn't get boring.
A very good introduction to programming.
Cons:
Uses an IDE, and recommends a Windows-specific IDE (though any multiplatform IDE will work.)
Graphics are left until the very end.
Limited scope, but it's easy to go on from here.
Recommendation:
Get it if you're a non-programmer looking to learn how to program. You may also want to get the "next" Java book you plan on using at the same time, and start referring to it as you work through this one. You should consider downloading Greenfoot then going through its tutorials to get a grounding in classes and objects. You'll also want to get a multi-platform IDE for Java, even if you are on Windows. You may decide to use Greenfoot for this, or BlueJ or Arachnophilia (or perhaps even Eclipse or NetBeans, if you have a mentor to help you get started with them.)
Saturday, August 2, 2008
Creating a Java Variable: Two Steps
There are two steps to creating a variable; declaration and initialization.
Declaration is creating a name and saying what type of variable it names:
Here we're saying "I hereby declare that I have a variable named count and that it will be used to name an integer variable. I also declare that a variable called name will be used to refer to a String object." And so on.
Now, these variables are only half done at this point. We've created names, but we haven't actually associated them with anything yet. It's like telling someone the names of your pets before you actually get them.
"I have a hamster named Wilmot and a cat called Tiger and a dog named Bowser."
"Where are they?"
"I don't have them yet."
At this point, telling someone to feed Wilmot wouldn't make much sense. You need a pet to go with the name. Similarly, asking your program to fetch data from your Scanner named input doesn't make sense until you have attached it to an actual instance of a Scanner. So let's do it:
This is called initialization. We gave it an initial value. In this case, we created a new Scanner object and made input refer to it (using the = sign.)
We can initialize the rest, too:
We initialized count to 0, name to an empty string, and frame to a new Jframe object.
Now we have things associated with the names. Now if we tell our program to get data from input and set name to point to it, it'll be able to do so, because now there's an actual Scanner connected with the name input:
Shortcut:Two Steps in One
You can declare and initialize a variable in one statement. But you still have to do both.*
This looks confusing. It's the redundancy of seeing, for example, Scanner twice on the same line. This happens because the object name, Scanner, is the same as the constructor name for making a new object of that type, Scanner(), except that the constructor has parentheses after it (marking it as a method, and the capitalized name being the name of a class tells you that it's a constructor method that makes a new one of those objects.)
We don't have to create a new object for initialization. If there's already an object of that type available, we can initialize a newly declared variable to that same object:
This declares a new Scanner called keyboard and initializes it to point to the same Scanner as input. In pet terms, this is like giving a nickname to your hamster Wilmot. You may have two names, say, Wilmot and Fluffy, but you've still got one hamster--he just goes by either name.
If you want another object, you need to create one:
Further reading.
*Actually, Java doesn't strictly require initialization all the time. But it's good programming practice to do so. It prevents a lot of bugs and nasty surprises in your programs.
Declaration is creating a name and saying what type of variable it names:
int count;
String name;
Scanner input;
JFrame frame;
Here we're saying "I hereby declare that I have a variable named count and that it will be used to name an integer variable. I also declare that a variable called name will be used to refer to a String object." And so on.
Now, these variables are only half done at this point. We've created names, but we haven't actually associated them with anything yet. It's like telling someone the names of your pets before you actually get them.
"I have a hamster named Wilmot and a cat called Tiger and a dog named Bowser."
"Where are they?"
"I don't have them yet."
At this point, telling someone to feed Wilmot wouldn't make much sense. You need a pet to go with the name. Similarly, asking your program to fetch data from your Scanner named input doesn't make sense until you have attached it to an actual instance of a Scanner. So let's do it:
input=new Scanner(System.in);
This is called initialization. We gave it an initial value. In this case, we created a new Scanner object and made input refer to it (using the = sign.)
We can initialize the rest, too:
count=0;
name="";
frame=new JFrame("Hello.");
We initialized count to 0, name to an empty string, and frame to a new Jframe object.
Now we have things associated with the names. Now if we tell our program to get data from input and set name to point to it, it'll be able to do so, because now there's an actual Scanner connected with the name input:
name=input.next();
Shortcut:Two Steps in One
You can declare and initialize a variable in one statement. But you still have to do both.*
int count=0;
String name="";
Scanner input=new Scanner(System.in);
JFrame frame=new JFrame("Hello.");
This looks confusing. It's the redundancy of seeing, for example, Scanner twice on the same line. This happens because the object name, Scanner, is the same as the constructor name for making a new object of that type, Scanner(), except that the constructor has parentheses after it (marking it as a method, and the capitalized name being the name of a class tells you that it's a constructor method that makes a new one of those objects.)
We don't have to create a new object for initialization. If there's already an object of that type available, we can initialize a newly declared variable to that same object:
Scanner keyboard=input;
This declares a new Scanner called keyboard and initializes it to point to the same Scanner as input. In pet terms, this is like giving a nickname to your hamster Wilmot. You may have two names, say, Wilmot and Fluffy, but you've still got one hamster--he just goes by either name.
Hamster wilmot=new Hamster("Syrian", AGOUTI);
Hamster fluffy=wilmot;
If you want another object, you need to create one:
Hamster fred=new Hamster("Teddy Bear", BANDED);Now you have a second hamster called fred.Further reading.
*Actually, Java doesn't strictly require initialization all the time. But it's good programming practice to do so. It prevents a lot of bugs and nasty surprises in your programs.
Thursday, July 31, 2008
Getting Keyboard Input for Console Apps: Java's Scanner Class
A nice gift that came with Java 1.5 was the Scanner class. It's part of the java.util package. This class simplifies many common programming tasks. One is getting text from the keyboard.
Prior to Scanner, this took a couple of extra steps. With Scanner, it's a snap. Just as we use System.out to print text to the command line, we use System.in to receive input. Like System.out, System.in is a data stream object. In this case, an InputStream object.
Our Scanner is named input. We could have called it gzorgnplat, if we wanted to--there's nothing magic about the name 'input'. We attach that name to a new Scanner object that accepts vlues from System.in. Then we print a message so that the user knows they're supposed to type something. The message is a question we want them to answer and a greater-than sign to let them know the computer is ready for them to type.
Being able to accept input while the program is running lets us create interactive command line apps.
Scanner can also be used to get particular types of input like numbers of particular primitive types.
It can also be used to get information from files in the same way it gets information from the user's keyboard. But that's another lesson.
Prior to Scanner, this took a couple of extra steps. With Scanner, it's a snap. Just as we use System.out to print text to the command line, we use System.in to receive input. Like System.out, System.in is a data stream object. In this case, an InputStream object.
import java.util.Scanner;

public class TrollTalk{
  public static void main(String arg[]){
    String nayme="";  // Declare & initialize a String to hold input.
    Scanner input=new Scanner(System.in); // Decl. & init. a Scanner.

    System.out.print("Whut yur nayme? >");  // Troll asks for name.
    nayme=input.next(); // Get what the user types.
    System.out.println();  // Move down to a fresh line.
    // Then say something trollish and use their name.
    System.out.println("Hur, hur! Dat's a phunny nayme, " + nayme + "!");
  }
}
Our Scanner is named input. We could have called it gzorgnplat, if we wanted to--there's nothing magic about the name 'input'. We attach that name to a new Scanner object that accepts vlues from System.in. Then we print a message so that the user knows they're supposed to type something. The message is a question we want them to answer and a greater-than sign to let them know the computer is ready for them to type.
Being able to accept input while the program is running lets us create interactive command line apps.
Scanner can also be used to get particular types of input like numbers of particular primitive types.
It can also be used to get information from files in the same way it gets information from the user's keyboard. But that's another lesson.
Monday, July 28, 2008
Killer Java IDEs for Beginners: Arachnophilia
Arachnophilia was once one of the leading Windows-only IDEs for web page development. Now, it has grown. It's written in Java, so it runs on any current system. It also has grown to support far more than HTML. It also supports Java and a slew of other languages.
It's simple and easy to use, but very powerful. It does syntax highlighting, recognizing Java's keywords, strings, and so on, making it easier to see mistakes when entering programs. It will also match parentheses, brackets, and braces for you, making it easier to avoid--or find--errors in your program there.
Arachnophilia has a great code beautifier built in. So if you're in the practice of not always doing all the indenting you might when you first enter your program, it will go through and clean up the program with all the proper indenting and newlines to make it look really nice.
The interface is easy to configure. You can add new buttons to your toolbar, and make new buttons that do specific tasks the way you want them to. If you want a single button that backs up your old source file, saves and compiles the present one, then runs it with specific java command line options, you can make it moments with Arachnophilia.
If you work with more than Java, having one IDE for all of them is convenient. For example, if you're working with HTML and CSS as well as Java, and maybe doing some JavaScript or python on the side, you can use Arachnophilia for all of them.
My only complaint with Arachnophilia is the lack of inbuilt printing functions. But this is a minor concern. Also, if you're a Mac user, you may find it odd to be using the control key for keyboard shortcuts rather than the Apple/Command key.
Arachnophilia is the IDE that I use with my high school classes, as I mention on my other blog. I use it myself, especially on my little ASUS Eee computer which has limited screen space and not a lot of storage space. It's not an IDE that's just good for classwork. It's good enough for real work.
Give it a try.
Friday, July 25, 2008
Killer Java IDEs for Beginners: BlueJ
![]()
It shows a graphical representation of the classes and objects in a program. It also teaches the use of program comments for automatically generating documentation for the program. And this all happens easily without any hoops to jump through. It's just there, and it does its thing.
It also gives quick and easy access to the API documentation for Java, making it easier to use and get familiar with. Because the same documentation format will be used for your own programs, how this format works will become clear really quickly.
The BlueJ site has some great tutorials doing fun things with Java and BlueJ. There's nothing like doing interesting exercises to make learning easier.
When you're ready to move onward and upward, BlueJ can be used with NetBeans, a considerably more sophisticated, and complex, IDE for Java. So BlueJ is not a classroom-only dead end.
Learning to program has never been easier. The many resources for Java make it a great way to start programming. BlueJ is a big part of making Java a great place to start. Check it out.
Thursday, July 24, 2008
Why Start at the Command Line?
Many instructors, including myself, start students out at the command line when we teach programming. With all the great tools out there, why bother? It's not like you start out a basic computer class with an old floppy-disk based system and start teaching the students how to run Windows or OS X by having them boot up CP/M or Integer BASIC.
The main reason I do it, even though I move on to a graphical integrated development environment (IDE) pretty quickly, is that it's important to understand what your tools are doing for you. Also, it's important to be able to work with your program files outside the IDE.
Your program is saved in a file, or a group of files. You should know how to recognize those files, and where to find them. They may be stored in a special directory for that programming project. You should know what it is named, and where to find it. At least well enough that you can recognize it when you do a file search.
You also may end up in a situation where you don't have the IDE but want to get something done. If you've taken a copy of your program to a friend's system, you should know how to run the program without the IDE. You should know which file is the source code and which is the compiled version that you want to actually run. And, since you're doing it with someone looking over your shoulder, you'll want to be able to do it without a lot of hemming and hawing and trying to remember how to start the program. Which means you'll want to be familiar with how it's done. You will also want to know how to check which version of Java is on the system, so if they're running a JVM from the days of the cavemen, you'll know. (And wouldn't it be nice to know how to install a newer one for them without any trouble?)
So don't let the command line put you off. Even if you've started with an IDE, go ahead and use the command line sometime to do the basic tasks of showing your source file's contents, compiling your source file, and running it.
Tuesday, July 22, 2008
eBook Recommendation: Java Programming for Kids, Parents and Grandparents by Yakov Fain
Java Programming for Kids, Parents, and Grandparents by Yakov Fain is a neat little ebook that provides a brief introduction to Java. It has some great exercises in it, and if you're doing an install of the SDK to a Windows system it gives directions in a fashion that is somewhat more direct than the ones from Sun.
While my preference is to introduce graphics before getting into flow control, the book puts flow control first. However, the material goes so quickly, and the program exercises are so much fun that it doesn't matter much here. The final exercises in the book are a couple of simple graphical video games, and it doesn't take too long to get to them.
I haven't tested the book on any real students yet, but I probably will. Once I do I'll post a more in-depth article on this book. The writing style is light, occasionally a bit condescending, but the material itself is well done.
Thumbs up to those resposible for writing and distributing Java Programming for Kids, Parents and Grandparents. A body of good material like this is what makes programming accessible to ordinary folks who might otherwise think you need to live like some sort of egghead monk to learn this stuff.
The contrast between the approach in this ebook with the first edition of Java Programming for Dummies (the Aaron Walsh version, not the fine book by Brad Burd) is striking. Essentially, the first Java for Dummies book told you "Java is hard, you're a Dummy. Since Java is too complicated for a Dummy like you, we're going to teach you JavaScript instead, even though you thought you bought a book on Java."*
The Fain book didn't bother to tell me what I can't do. It was too busy telling me what I can do. On top of that, Yakov Fain's book is a free ebook, so it cost me $25 less than the Dummies book. (Yeah, I still feel burned on that one. ;) )
* It wasn't bad at all as a book on JavaScript, BTW. But it wasn't being sold as a book on JavaScript. It even has a short section on Java applets and chapter titles that refer specifically to Java inside to confuse the issue for those who see the cover screaming "Java" and take the time to flip through it. This book put me off Dummies books for about ten years, and only the excellence of many of their current books brought me back.
Sunday, July 20, 2008
Controlling Java's Graphics: paintComponent() and repaint()
Why do we put all our graphical drawing code into a paintComponent() method? It seems odd, since it would seem we should be able to simply stick some simple graphics commands into our main() method in a Java application and just get the drawing done. Where does paintComponent come from? If we never call it in our code, how does it get executed?
It seems like magic, doesn't it? You just sort of set it up and somehow it happens. Hopefully when and how we want it to. It seems like a vaguely disquieting form of magic, perhaps.
When Java does graphics, suddenly you're not in the strict control of the program that you are with command line applications. With graphics, your program is now interacting with the other parts of your computer's operating system. It's not just running in its own little corner of the machine. Now it's got a window out on that shared resource, the display, and the window has to interact properly with everything else that's on the display.
Think of it this way, if you are just driving around on private property all by yourself you don't have to worry about traffic. Off on your own stretch of road, with an unused parking lot or two to tool around in, you don't have to worry about sharing. You can cross the center line, pull on and off the road without signalling, you don't even need a license so long as you don't go on a public road.
But once you head for the public roads and freeway, you've got to share. The rules matter. It gets more complicated than buzzing around in a go-cart or whatever on private property. And things happen that you don't have any direct control over, like red lights and merging traffic.
When you move your program on to the display in Java, you don't have to do everything on your own as you would have to in a car. Java's graphics system takes care of a lot for you. Unfortunately this means your code starts looking like magic. Methods get called without you doing the calling. But it's OK. All you need to know is what to expect.
The paintComponent() method redraws your graphics area. In our examples so far this has been a JPanel. There are two ways paintComponent() can get called. One is automatic, the other is up to you.
The automatic way is what we've used so far. The computer's window manager automatically calls for your program to redraw its graphics whenever a window it owns appears to need redrawing. The window manager can decide this for any of a number of reasons. Such as when the window initially appears on screen. Or if the window has been covered up in part or in whole by another window on screen, and the covered part has just been uncovered. Maybe the window had been minimized, and has just been restored.
When these sort of things happen, the Java Runtime Environment calls the paint() method for your container. In our examples so far, our container has been a JFrame. It will be a "heavyweight" component (see the JFrames article for a brief discussion on this.) Once the container redraws itself, it'll pass the command down to its children, that is, the lightweight components that live inside it. A lightweight component from the Swing package uses the paintComponent() method to redraw itself. So that's what gets called. Shazam! It's like magic!
This means you want to set up paintComponent() to draw things the way you want them when it gets called. If you're doing drawings that don't change, like the examples we've done to date, then you don't need to look up any information. If you're doing anything animated or that otherwise changes over time, you need to have paintComponent() be able to look things up at the time of drawing to properly reflect conditions in the drawing.
Now, let's say you've changed something in your program and you want to redraw to show the change. You probably don't want to wait until the window manager thinks your window needs redrawing. If nobody is changing things on the screen otherwise, it may not redraw until way too late!
Does that mean you put a call to paintComponent() in your program? No! You would be taking a chance of breaking something if you did. You want to start from the top, like the Java Runtime Environment did. In your case, you want to call repaint(). This will take things from the top. It also handles some possibilities that jumping in and calling paintComponent() on your own will not.
Like, let's say both you and the window manager decide to redraw at the same time. If you bypass repaint() you'll be slowing down your program by making it repaint twice when it really only needs to redraw once. When you call repaint(), Java catches this for you and saves you some computer time by only redrawing once. It'll also catch redraw requests made while the redrawing is going on and deal with them appropriately. Your paintComponent() method will get called in its own turn when you use repaint().
So, if you have new information you want depicted on screen, use repaint().
Put all your drawing inside paintComponent() and let the system take care of knowing when to call it otherwise. Give paintComponent() the ability to get the information it needs to draw things the way you want them now. If you're getting ahead of what I've written here, and aren't sure how to get through the Object Oriented barriers, look up "inner classes" for a start. It gives you a way to get the information where you need it when you need it.
Saturday, July 19, 2008
Very Basic Java Graphics: 3 Examples
We're going to build up a graphics app from something so basic it doesn't really work, like the example from Java Graphics--Start with a JFrame and building to something more sophisticated. In the JFrame article and in A Most Basic Graphics App I've avoided the use of comments in the code to keep it shorter. In these examples I'm going to include comments in the code to describe what's happening. So don't be scared of the length of these examples, most of what's there is just comments, which Java ignores. They're there just for humans.
This example draws a line on the JFrame. The window decorations take up some of our drawing space, so the title bar may cover some of our line. With some JVMs the background area of the JFrame won't be cleared before you draw. Also, when you close the window using the close button, the application doesn't shut down. For many applications on Mac OS X this is normal behavior, but on other OSes, and even many applications under OS X it's normal to expect an application to close down completely if you click the close button on the last open window (for applications that have multiple windows) or the close button on the main window for other applications.
So here's our next example, where we take care of that last problem:
The magic line that makes the application exit when we click the close button is the one that reads: frame.setDefaultCloseOperation(JFrame.EXIT_ON_CLOSE);. We can tell that EXIT_ON_CLOSE is a type of variable called a "constant" because the name follows the convention of being written in all capital letters. So we're not YELLING when we say "EXIT_ON_CLOSE" we're using the value stored in EXIT_ON_CLOSE as part of the JFrame class.
A JFrame has this constant available because it implements the interface WindowConstants. By implementing this interface, in essence, the JFrame class of objects promise to do the right thing if one of these constants is passed to a method that handles it, in this case setDefaultCloseOperation.
Our final example for this entry goes one big step further:
Here, we've added a JPanel inside the drawable area of our JFrame. This means that if we start drawing at 0,0 we'll actually be drawing somewhere we can see it, it won't be hidden by the window decorations.
The other big change is the change of our drawing method's name from paint() to paintComponent(). This is because we changed from a JFrame to a JPanel. If you take a look at JPanel in the API Specification you'll see that it extends JComponent. This family of objects uses paintComponent() to manage drawing.
This last example is a good starting point for any graphical operation. In future examples, I'll be extending it further to add additional features.
/* BasicFrame.java

  This is a really simple graphics program.
  It opens a frame on the screen with a single
  line drawn across it.

  It's not very polished, but it demonstrates
  a graphical program as simply as possible.mag-27Apr2008
*/

// Import the basic graphics classes.
import java.awt.*;
import javax.swing.*;

public class BasicFrame extends JFrame{

  // Create a constructor method
  public BasicFrame(){
    // All we do is call JFrame's constructor.
    // We don't need anything special for this
    // program.
    super();
  }

  // The following methods are instance methods.
  /* Create a paint() method to override the one in JFrame.
     This is where the drawing happens.
     We don't have to call it in our program, it gets called
     automatically whenever the frame needs to be redrawn,
     like when it it made visible or moved or whatever.*/
  public void paint(Graphics g){
    g.drawLine(10,10,150,150); // Draw a line from (10,10) to (150,150)
  }

  public static void main(String arg[]){
    // create an identifier named 'window' and
    // apply it to a new BasicFrame object
    // created using our constructor, above.
    BasicFrame frame = new BasicFrame();

    // Use the setSize method that our BasicFrame
    // object inherited to make the frame
    // 200 pixels wide and high.
    frame.setSize(200,200);

    // Make the window show on the screen.
    frame.setVisible(true);
  }
}
This example draws a line on the JFrame. The window decorations take up some of our drawing space, so the title bar may cover some of our line. With some JVMs the background area of the JFrame won't be cleared before you draw. Also, when you close the window using the close button, the application doesn't shut down. For many applications on Mac OS X this is normal behavior, but on other OSes, and even many applications under OS X it's normal to expect an application to close down completely if you click the close button on the last open window (for applications that have multiple windows) or the close button on the main window for other applications.
So here's our next example, where we take care of that last problem:
/* CloseFrame.java
  This is a really simple graphics program.
  It opens a frame on the screen with a single
  line drawn across it.

  We're starting to add a little bit of polish
  here--we make the program close nicely when
  the close box is clicked, rather than just
  sort of hanging around half-dead.
  mag-28Apr2008
*/

// Import the basic graphics classes.
import java.awt.*;
import javax.swing.*;

public class CloseFrame extends JFrame{

  // Create a constructor method
  public CloseFrame(){
    // All we do is call JFrame's constructor.
    // We don't need anything special for this.
    super();
  }

  // The following methods are instance methods.

  /* Create a paint() method to override the one in JFrame.
     This is where the drawing happens.
     We don't have to call it in our program,
     it gets called automatically whenever the
     frame needs to be redrawn, like when it is
     made visible or moved or whatever.
  */
  public void paint(Graphics g){
    g.drawLine(10,10,150,150); // Draw a line from (10,10) to (150,150)
  }

  public static void main(String arg[]){
    BasicFrame frame = new BasicFrame();
    // This uses a constant EXIT_ON_CLOSE that's a member of JFrame.
    // The constant is passed to the setDefaultCloseOperation method
    // of our frame object, which is a CloseFrame object,
    // which inherits the method from its parent JFrame.
    // It makes the program exit (close completely) when we click
    // the close button.
    frame.setDefaultCloseOperation(JFrame.EXIT_ON_CLOSE);
    frame.setSize(200,200);frame.setVisible(true);
  }
}
The magic line that makes the application exit when we click the close button is the one that reads: frame.setDefaultCloseOperation(JFrame.EXIT_ON_CLOSE);. We can tell that EXIT_ON_CLOSE is a type of variable called a "constant" because the name follows the convention of being written in all capital letters. So we're not YELLING when we say "EXIT_ON_CLOSE" we're using the value stored in EXIT_ON_CLOSE as part of the JFrame class.
A JFrame has this constant available because it implements the interface WindowConstants. By implementing this interface, in essence, the JFrame class of objects promise to do the right thing if one of these constants is passed to a method that handles it, in this case setDefaultCloseOperation.
Our final example for this entry goes one big step further:
/* BasicJPanel.java
  This is a somewhat more sophisticated drawing program.
  It uses a new child of JPanel as the drawing surface
  for a JFrame, to avoid the problems with drawing
  directly on a JFrame.

  A custom JPanel child class called BasicJPanel is created
  with its own paintComponent method, which contains our
  drawing code.

  A generic JFrame is then created to hold the BasicJPanel
  object, the BasicJPanel is created, made into the JPanel's
  content pane, and our paintComponent method is called
  automatically. *Whew!*
  mag-28Apr2008
*/

// Import the basic graphics classes.
import java.awt.*;
import javax.swing.*;

public class BasicJPanel extends JPanel{

  // Create a constructor method
  public BasicJPanel(){
    super();
  }

  // The following methods are instance methods.

  /* Create a paintComponent() method to override the one in
    JPanel.This is where the drawing happens. We don't have
    to call it in our program, it gets called automatically
    whenever the panel needs to be redrawn, like when it is
    made visible or moved or whatever.
  */
  public void paintComponent(Graphics g){
    g.drawLine(10,10,150,150); // Draw a line from (10,10) to (150,150)
  }

  public static void main(String arg[]){
    JFrame frame = new JFrame("BasicJPanel");
    frame.setDefaultCloseOperation(JFrame.EXIT_ON_CLOSE);
    frame.setSize(200,200);

    // Create a new identifier for a BasicJPanel called "panel",
    // then create a new BasicJPanel object for it to refer to.
    BasicJPanel panel = new BasicJPanel();

    // Make the panel object the content pane of the JFrame.
    // This puts it into the drawable area of frame, and now
    // we do all our drawing to panel, using paintComponent(), above.
    frame.setContentPane(panel);
    frame.setVisible(true);
  }
}
Here, we've added a JPanel inside the drawable area of our JFrame. This means that if we start drawing at 0,0 we'll actually be drawing somewhere we can see it, it won't be hidden by the window decorations.
The other big change is the change of our drawing method's name from paint() to paintComponent(). This is because we changed from a JFrame to a JPanel. If you take a look at JPanel in the API Specification you'll see that it extends JComponent. This family of objects uses paintComponent() to manage drawing.
This last example is a good starting point for any graphical operation. In future examples, I'll be extending it further to add additional features.
Thursday, July 17, 2008
Stars in import Statements
import java.awt.*;
import java.awt.event.*;
import javax.swing.*;
import javax.swing.event.*;
These are some representative import statments. Each one has an asterisk (or "star") at the end of it. What does that mean?
The asterisk is a special pattern-matching character. It matches any combination of characters (letters, numbers, or special characters.) In other words, it will match any name of any class in the package. Let's say we want to import Frame, Panel, Component, Color, Dialog, Dimension, Graphics and Image from the java.awt package for a program we're writing. We could have the following import statements:
import java.awt.Frame;
import java.awt.Panel;
import java.awt.Component;
import java.awt.Color;
import java.awt.Dialog;
import java.awt.Dimension;
import java.awt.Graphics;
import java.awt.Image;
Since star can take the place of any name, we can replace all of those import statements with one:
import java.awt.*;
This imports every class in java.awt. It also imports all the interfaces, exceptions, and errors defined in java.awt. It makes absolutely everything in the java.awt package available to our program.
OK, then why do we need to do this?
import java.awt.*;
import java.awt.event.*;
If the * makes us get everything in java.awt, why do we need to then go an import java.awt.event.*?
The reason is that java.awt.event is a different package than java.awt. The stuff in java.awt.event isn't actually in java.awt. With package names, the dot notation is just a way of letting us know that the stuff in java.awt.event is related to the stuff in java.awt, and that we'll probably want to use the stuff in these packages together. But java.awt.event isn't in java.awt, the way that System.out is in the class System.
Just remember, every package with its own name is a totally different package. You can tell a class name from a package name by whether it is capitalized:
import java.awt.Color;
Color is a class in the java.awt package. This is one of the reasons we follow the convention of using a capital letter at the start of a class's name. Whereas this:
import java.awt.color.*;
is an import of the classes in the java.awt.color package. These classes are not in java.awt, so you can't import them using "import java.awt.*;"
The asterisk is a "regular expression" character. It and a number of other characters are a way of building up what are called regular expressions, which are a way of matching things without using the precise name. The asterisk is a "wildcard," it can stand for any character, or any number of any characters.
Tuesday, July 15, 2008
Drawing Lines
In A Most Basic Graphics App we had the framework of a simple graphics application. We trimmed it down a little, too much really, in Start With a JFrame. The JFrame alone doesn't accomodate graphics as well as we would like. The "window decorations"--the title bar, the frame around the window, close button and so on--all cover part of our drawing area. Likewise, there are other problems that crop up on different JVMs.
So we'll use the BasicPanel.java program from A Most Basic Graphics App to build on now.
We're going to concern ourselves with the part of the program that does the actual drawing:
In particular, we're going to focus on those four numbers inside the parentheses. What are they? Where do they come from? How can we pick numbers that will let us draw what we want, and what are the limits on what we can put in there?
First, let's look at what our limits are. At the low end, we have the number zero. Computers start counting at zero, and that's the low end number for what we can enter here and expect results. You can put a negative number in here, but unless you do some other things we're not going into here, negative numbers aren't going to do you any good.
For the high number, you can go up to the limits of the type, if you like. In this case we're calling drawLine(int, int, int, int), so we can go up to the limits of an int, or 2147483647, and not cause a problem so far as Java is concerned. We humans like to see our results, though. There's another line of BasicPanel we need to consider. That's this one:
We can find out exactly how large our drawing area is by using the getClipBounds() method of the Graphics class. Feel free to experiment with it, but for now let's get back to talking about the four numbers we use with drawLine and what they do. Just saying we have a high limit of 200 on those numbers is good enough for now.
OK, so we can use numbers from 0 to somewhere short of 200 in any of those four locations and expect results.
A Pair of Pairs
The four numbers in drawLine aren't just four numbers, they're two pairs of number. The first two numbers are the first pair, the third and fourth numbers are the second pair. Each pair of numbers is a Cartesian coordinate. If you don't remember or haven't studied this in Geometry class, don't sweat it. We'll suss things out well enough here.
The first pair marks the starting point for our line, the second pair marks the ending point.
The first number in each pair says how far left or right we want that point. The second number in each pair says how far up or down we want that point.
On left and right, 0 is all the way to the left. The higher the number, the farther over to the right we'll be. In our case, we can go up to 200 (almost.) A number of about 190 will probably take us all the way to the right of our drawing area.
On up and down, 0 is all the way to the top. The higher the number, the lower we'll go. A number of about 185 or so will take us all the way to the bottom of our drawing area.
If we want to draw a line all the way across our drawing area, instead of just partway across, we can replace
Fine, we've mastered drawing a line from the top left to the bottom right. We're not exactly drawing starships yet, are we?
What if we change the pairs of numbers around? Open up your editor and make this change to the drawLine() statement:
Horizontal Lines
If we want a line to be horizontal, both the up-and-down numbers need to be the same. This means the second number in each pair, the second and fourth numbers. Add the following line to BasicPanel right after your other drawLine() statement:
Vertical Lines
Now let's try vertical lines. For these, the first and third numbers (the left-right numbers) need to be the same:
Starting and Ending
Now we can draw multiple lines to build up objects. By starting and ending the lines at the same points, we can make them meet up, and use the individual lines to build up objects. using our vertical and horizontal lines, we can make up squares and rectangles, or draw pictures that look like they're off an Etch-a-Sketch. ;)
Open up BasicPanel and replace all the existing drawLine() statements with the following:
Now, if we just wanted to draw boxes Java actually has a way to do this more efficiently. But what we're focusing on here is coordinates and how to use them.
Play around with different points and see what effect you get. Try drawing a triangle. Try drawing different sloping lines, both ones that slope down from left to right and ones that slope up. Remember, when you slope up the point on the right is going to have a second (up-down) number lower than the point on the left.
Once you play around for a while, you'll get the hang of it. If you want a larger screen area to play with, enlarge the numbers in the setSize() statement. Try this for a start:
So we'll use the BasicPanel.java program from A Most Basic Graphics App to build on now.
We're going to concern ourselves with the part of the program that does the actual drawing:
g.drawLine(10,10,150,150); // Draw a line from (10,10) to (150,150)
In particular, we're going to focus on those four numbers inside the parentheses. What are they? Where do they come from? How can we pick numbers that will let us draw what we want, and what are the limits on what we can put in there?
First, let's look at what our limits are. At the low end, we have the number zero. Computers start counting at zero, and that's the low end number for what we can enter here and expect results. You can put a negative number in here, but unless you do some other things we're not going into here, negative numbers aren't going to do you any good.
For the high number, you can go up to the limits of the type, if you like. In this case we're calling drawLine(int, int, int, int), so we can go up to the limits of an int, or 2147483647, and not cause a problem so far as Java is concerned. We humans like to see our results, though. There's another line of BasicPanel we need to consider. That's this one:
frame.setSize(200,200);This is setting the size of our JFrame (creatively named "frame") to 200 pixels wide and 200 pixels high. Since the JPanel we're drawing to is inside this JFrame, we know that the highest point we're going to see is less than this. How much less varies. It's based on how wide big the window decorations are on the JFrame, and this varies by operating system, and by the user's settings. But we definitely know that anything over 200 on the high end is going to be invisible. Higher numbers won't affect Java or your computer. You won't have a line that shoots out of its window and across your desktop if you make the numbers too high. You just won't see anything outside the JPanel area on which we're drawing.
We can find out exactly how large our drawing area is by using the getClipBounds() method of the Graphics class. Feel free to experiment with it, but for now let's get back to talking about the four numbers we use with drawLine and what they do. Just saying we have a high limit of 200 on those numbers is good enough for now.
OK, so we can use numbers from 0 to somewhere short of 200 in any of those four locations and expect results.
A Pair of Pairs
The four numbers in drawLine aren't just four numbers, they're two pairs of number. The first two numbers are the first pair, the third and fourth numbers are the second pair. Each pair of numbers is a Cartesian coordinate. If you don't remember or haven't studied this in Geometry class, don't sweat it. We'll suss things out well enough here.
g.drawLine(10,10,150,150); // Draw a line from (10,10) to (150,150)Notice how in the comment I say we're drawing a line from (10, 10) to (150, 150). Notice the first two numbers in g.drawLine() are 10 and 10, and the second two numbers are 150 and 150. This Means Something. ;)
The first pair marks the starting point for our line, the second pair marks the ending point.
The first number in each pair says how far left or right we want that point. The second number in each pair says how far up or down we want that point.
On left and right, 0 is all the way to the left. The higher the number, the farther over to the right we'll be. In our case, we can go up to 200 (almost.) A number of about 190 will probably take us all the way to the right of our drawing area.
On up and down, 0 is all the way to the top. The higher the number, the lower we'll go. A number of about 185 or so will take us all the way to the bottom of our drawing area.
If we want to draw a line all the way across our drawing area, instead of just partway across, we can replace
g.drawLine(10,10,150,150); // Draw a line from (10,10) to (150,150)with
g.drawLine(0,0,200,200);This will actually "go over" the edge of our drawing area, but it won't matter. Open up BasicPanel in your editor, make this change, compile it and run it.
Fine, we've mastered drawing a line from the top left to the bottom right. We're not exactly drawing starships yet, are we?
What if we change the pairs of numbers around? Open up your editor and make this change to the drawLine() statement:
g.drawLine(200,200,0,0);Once you compile and run, what do you see? It looks the same, right? That's because we drew a line between the same two points, we just drew from bottom right to top left this time. OK, I hear you saying "Borrrringgg!" Let's move on.
Horizontal Lines
If we want a line to be horizontal, both the up-and-down numbers need to be the same. This means the second number in each pair, the second and fourth numbers. Add the following line to BasicPanel right after your other drawLine() statement:
g.drawLine(10,50,200,50);Compile and run, and now you have a horizontal line. Notice the second and fourth numbers are the same. If you want to move the horizontal line up or down, change the number in the second and fourth position:
g.drawLine(10,20,200,20); // A higher horizontal line
g.drawLine(0,0,200,200); // A lower horizontal lineThe higher the number you put in the second and fourth positions the lower the horizontal line will be. Go ahead and add these lines to your program, one at a time, and compile and run.
Vertical Lines
Now let's try vertical lines. For these, the first and third numbers (the left-right numbers) need to be the same:
g.drawLine(50,0,50,200); // A vertical line.Change the 50s to some other number to move the vertical line left or right.
Starting and Ending
Now we can draw multiple lines to build up objects. By starting and ending the lines at the same points, we can make them meet up, and use the individual lines to build up objects. using our vertical and horizontal lines, we can make up squares and rectangles, or draw pictures that look like they're off an Etch-a-Sketch. ;)
Open up BasicPanel and replace all the existing drawLine() statements with the following:
g.drawLine(50,20,150,20); // Draw a horizontal line from (50,20) to (150,20)
g.drawLine(150,20,150,150); // Draw a vertical line from (150,20) to (150,150)
g.drawLine(150,150,20,150); // Draw a horizontal line from (150,150) to (20,150)
g.drawLine(20,150,50,20); // Draw a vertical line from (20,150) to (50,20)Notice how the points we use match up (look at the pairs in the comments.) The last point is the same as the first to close the box.
Now, if we just wanted to draw boxes Java actually has a way to do this more efficiently. But what we're focusing on here is coordinates and how to use them.
Play around with different points and see what effect you get. Try drawing a triangle. Try drawing different sloping lines, both ones that slope down from left to right and ones that slope up. Remember, when you slope up the point on the right is going to have a second (up-down) number lower than the point on the left.
Once you play around for a while, you'll get the hang of it. If you want a larger screen area to play with, enlarge the numbers in the setSize() statement. Try this for a start:
frame.setSize(480,480);This will give you more room to play it. Now you can take numbers up to about 480 before they go out of view. Try using getClipBounds() to find out just how large a number you can get. If you can't get it, don't sweat it, I'll cover it in a future post, or you can do an internet search to find an example in someone else's program, or jump into a Java newbie forum and ask.
Friday, July 11, 2008
The Java Virtual Machine: Adapter Cables for Your Computer's Insides
One of the problems programmers have is that different computer systems all require different ways to program them. Each computer has its own way of doing graphics and sound, its own way to talk to the keyboard and mouse, and so on. So a program written for one system wouldn't run on another.
We used to have this problem with the hardware on computers, too. If you had a Windows computer and an Apple display, they wouldn't hook up to each other. Apple computers and PCs used different video connectors. The keyboards and mice also had different connectors. The same was true of Unix workstations. They had their own connectors for their monitors, keyboards, and so on, and the connectors for Sun workstations were different from those for HP workstations.
While the outsides of computers are pretty standard now--you can hook up a PC monitor to a Mac and vice versa, the same for USB keyboards and mice--the insides are still just as weird as the outsides used to be. Each computer maker has their own connection for programs that want to talk to graphics, sound, keyboard and mouse, and so on.
Back in the old days we could hook up hardware from different manufacturers sometimes using adapter cables. In other cases, we had adapters that not only connected from one connector to another, but also translated the electronic signals.
For programmers that want to write programs that run on lots of different computer systems, the Java Virtual Machine (JVM) is like a bundle of adapter cables between your program and the computer system it's running on. No matter what system you are on, the JVM makes it look the same to your program:

This is why it's called a "virtual" machine. Java provides a sort of make-believe computer that we can program for. Then the JVM makes other computer systems pretend to be that make-believe computer. So programs written for that make-believe computer will run on any computer that has the JVM on it.
In this way the JVM acts like a whole bunch of adapter cables. On a Windows system it takes the oddball connector from its graphics system and adapts it to your program so that you can use familiar graphics objects and their methods. Similarly, it adapts the sound from OS X to your program, so that you can play music or sound effects. It adapts the filesystem from Unix so that you can read and write files using the same objects and methods as you would use on Windows or OS X. And so on. The JVM adapts all the major parts of a computer to your program, so that you can wrote one program and have it run on all major computer systems, rather than having to spend your time writing it over and over for different systems.
The system isn't perfect. The biggest problem has to do with how programs are "packaged" on each of the different systems. Your program will be the same, but the way you get it to act like a native program on each system for the user varies. The program itself will be the same, but it may need a "helper" file or some other item on each host system to make it look just like a program written directly for that system.
This will typically not be a concern for you as a programmer when you're starting out. And packaging your programs for each operating systems is a lot less work than learning all the ins and outs of how to program each system (or even just one of the systems.)
The JVM is such a useful tool that languages other than Java are being written to take advantage of it. Jython, for example, is a version of the python language that's written to use the JVM. It lets you write python programs that will run on any system with a JVM on it. Groovy is another such language. There's a long list of languages that run on the JVM in addition to Java.
We used to have this problem with the hardware on computers, too. If you had a Windows computer and an Apple display, they wouldn't hook up to each other. Apple computers and PCs used different video connectors. The keyboards and mice also had different connectors. The same was true of Unix workstations. They had their own connectors for their monitors, keyboards, and so on, and the connectors for Sun workstations were different from those for HP workstations.
While the outsides of computers are pretty standard now--you can hook up a PC monitor to a Mac and vice versa, the same for USB keyboards and mice--the insides are still just as weird as the outsides used to be. Each computer maker has their own connection for programs that want to talk to graphics, sound, keyboard and mouse, and so on.
Back in the old days we could hook up hardware from different manufacturers sometimes using adapter cables. In other cases, we had adapters that not only connected from one connector to another, but also translated the electronic signals.
For programmers that want to write programs that run on lots of different computer systems, the Java Virtual Machine (JVM) is like a bundle of adapter cables between your program and the computer system it's running on. No matter what system you are on, the JVM makes it look the same to your program:
This is why it's called a "virtual" machine. Java provides a sort of make-believe computer that we can program for. Then the JVM makes other computer systems pretend to be that make-believe computer. So programs written for that make-believe computer will run on any computer that has the JVM on it.
In this way the JVM acts like a whole bunch of adapter cables. On a Windows system it takes the oddball connector from its graphics system and adapts it to your program so that you can use familiar graphics objects and their methods. Similarly, it adapts the sound from OS X to your program, so that you can play music or sound effects. It adapts the filesystem from Unix so that you can read and write files using the same objects and methods as you would use on Windows or OS X. And so on. The JVM adapts all the major parts of a computer to your program, so that you can wrote one program and have it run on all major computer systems, rather than having to spend your time writing it over and over for different systems.
The system isn't perfect. The biggest problem has to do with how programs are "packaged" on each of the different systems. Your program will be the same, but the way you get it to act like a native program on each system for the user varies. The program itself will be the same, but it may need a "helper" file or some other item on each host system to make it look just like a program written directly for that system.
This will typically not be a concern for you as a programmer when you're starting out. And packaging your programs for each operating systems is a lot less work than learning all the ins and outs of how to program each system (or even just one of the systems.)
The JVM is such a useful tool that languages other than Java are being written to take advantage of it. Jython, for example, is a version of the python language that's written to use the JVM. It lets you write python programs that will run on any system with a JVM on it. Groovy is another such language. There's a long list of languages that run on the JVM in addition to Java.
Thursday, July 10, 2008
The void Type
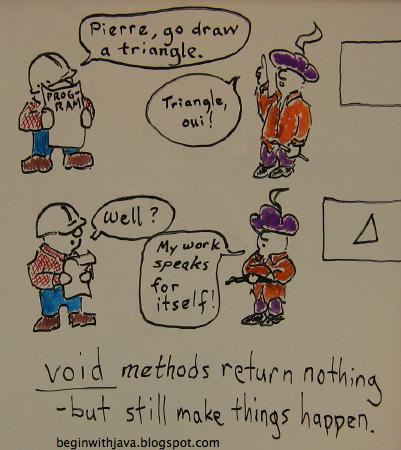
void can be the most confusing type. It's an odd word to start with. It's part of the long string of words that appear before the word main in the declaration of that method.
Void means 'empty' or 'nothing'. In the case of a Java method, it means that that method returns nothing:
public void drawTriangle(){ ...
This is as opposed to a method with another type, which returns an object of that type:
public int sum(int a, b){
  return a + b;
}
This returns an int object to the caller:
int count1, count2, amt;
...
amt=sum(count1, count2);
Why would you want a method that returns nothing? Because often you have methods that do something that doesn't affect the state of the program itself. Drawing something is an example of this. A method that draws something makes its results obvious in what it draws. It doesn't need to pass any information back to the other parts of the program. Instead it is expressing the state of the program to the outside world.
Tuesday, July 8, 2008
The Code Code: Source, Object, and Byte Code
So what are all these "codes" that keep getting discussed? Here's a guide:
Code: a general term to refer to the program text. When it isn't preceded by a word like 'object' or 'byte' it usually refers to the human-readable code, also called 'source code.'
Source Code: The human-readable stuff you type in. Well, sort of human-readable if you ignore all the odd punctuation that makes your Java files look like something written in one of those languages that includes clicks, grunts, and squeals. Java source code lives in files with .java on the end.
Object Code: Normally this refers to a program in a form that the host system can run directly. For example, C source code is fed into a C compiler/linker which produces an object code file that can be run on the host system directly (No virtual machine like Java's JVM.) In the case of Java, however, the term tends to get used to refer to Bytecode. This use of the word "object" has nothing to do with Objects in Java or object-oriented programming.
Byte Code or Bytecode: This is what the javac compiler produces. It is code in a form runnable by the Java Virtual Machine (JVM.) The host computer can't run it directly (unless you've got a really specialized computer system.) It lives in files with .class on the end.
In Java, the stuff you write and give to the compiler is source code.
The stuff the compiler writes out (if your program has no errors) is bytecode.
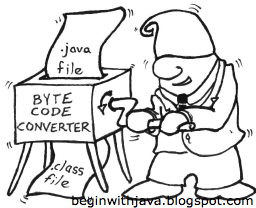
Monday, July 7, 2008
Java Graphics--Start with a JFrame
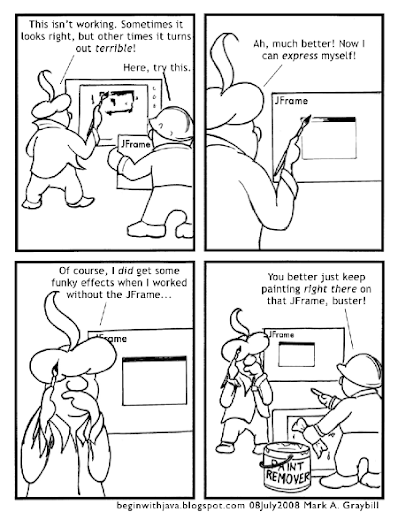
In A Most Basic Graphics App I presented a skeleton program that's suitable as a starting point for a graphics application. It deserves some explanation before we add more to it.
There are two graphics "components" that appear in this program, a JPanel and a JFrame. Why use both? If we want a really basic graphics app, why isn't one or the other enough?
If we're going to choose between the two, we'd have to take the JFrame. A Frame component is a special graphics component that lives on top of the host computer's graphics system. In Java it's called a "heavyweight" component. The "backboard" on which you draw, or place other components, has to be a heavyweight component. Only a heavyweight component can be guaranteed to be drawn correctly when placed directly on the user's display. Lightweight components have to be placed on top of a heavyweight component.
Since JPanel is a lightweight component, we can't use it without a heavyweight like JFrame to place it on. So if we're just picking one component, it's going to be the JFrame:
import java.awt.*;
import javax.swing.*;

public class JustaFrame extends JFrame{

  public JustaFrame(){
    super();
  }

  public void paint(Graphics g){
    g.drawLine(10,10,150,150);
  }

  public static void main(String[] arg){
    JustaFrame frame = new JustaFrame();

    frame.setSize(200,200);
    frame.setVisible(true);
  }
}
You'll notice a problem here if you run the program. The "window decorations" for the title bar, window borders, and so on take away a piece of the space from the drawing area. Unless you've got pretty narrow title bars on your system, the line drawn by this program will start up underneath the title bar.
It's possible to find out how much space these items take up, and compensate. Or you can add another component in the visible drawing area as I did with the JPanel in the original program.
There's another difference here. The drawing is done by a paint() method, rather than a paintComponent() method. This is part of the difference between different types of components. If you change paint() into paintComponent() this program will compile and run, but it won't draw the line.
Later, we'll talk about the magic behind the paint() and paintComponent() methods and some of the other hidden mysteries of Java's graphics.
Sunday, July 6, 2008
Parens and Brackets and Braces, Oh My!
If you paid attention in English class when they were discussing the use of parentheses, curly braces, square brackets and so on I'm afraid it won't do you much good in Java. Java has a specific use for each of these, and it definitely pays to get then sorted out.
Knowing the names for each of the symbols is a good starting point:
{ } are curly braces.
( ) are parentheses (one is called a parenthesis.) Parens or paren for short.
[ ] are square brackets.
< > are called angle brackets. They're the same characters as the less than and greater than signs.
The first one of any pair is called the "opening" item; opening curly brace, opening parenthesis, etc. The second of a pair is called the "closing" item; closing square bracket, closing paren, and so on.
{ }
We discussed curly braces in Code Blocks, and mentioned briefly that they are a form of divider in Java in Those Pesky Semicolons. Curly braces mark the start and end of a code block.
Hold the phone! There's another use of curly braces. They can also be used to enclose a list that is used as an array initializer. For example:
int nums[] = {1, 2, 3};
This line declares an array named nums[] and initializes its first three elements to values 1, 2, and 3.
( )
Parentheses happen a lot in Java. They mark the start and end of the parameter list of a method. This includes both constructor methods and instance methods. The parameter list contains the information that is passed to the method to let the method do its job. If the method doesn't need any information, the parens are still there, there's just nothing between them: println(). A pair of parens at the end of a name is an easy way of identifying a method.
[ ]
Square brackets are used to enclose the "indexing expression" of an array. If you see square brackets, it's an array.
< >
When <> are not playing the part of "less than" and "greater than" they enclose the indexing expression of a collection. Collections are like arrays but considerably more flexible in the things they can do. Consider them as a sort of "super array."
There you are. Now you're prepared to punctuate your Java programs with the best of them, and hopefully you'll be able to read Java programs more easily. If you get into a dispute with your English teacher over these symbols, though, you're on your own!
Thursday, July 3, 2008
Constructor Methods
A constructor method is a method that creates an object. To create the object, it uses the class as a sort of blueprint for what member variables the object has, what instance methods, and so on.
The name of a constructor method is the same as the name of the class. For example, if we have a class named Dragon its constructor will be named Dragon as well:
There are a couple of things to notice here. One is that, unlike a regular method, the first character is upper-case, just like the class name. The constructor name must exactly match the class name. While it is only a convention that classes (and therefore, their constructor methods) start with a capital letter, it is an iron-clad requirement that the constructor name match the class name.
The other thing you'll want to notice is that there's no type given in the method declaration. A normal method (called an instance method, if we want to get formal) has a type provided in its declaration, just as a variable has a type in its declaration:
A Dragon constructor returns a Dragon object. A String constructor returns a String object. That's what it constructs, so that's what it returns. Declaring a type would be redundant:
A Subtle Error
If you accidentally have a typo in your program that results in your class and constructor having different names, the compiler will complain that you've got a method without a type declaration. You'll look at the code and say "Hey! That's a constructor. It doesn't need a type declaration! What is my compiler smoking?"
What's happening here is that the compiler sees that the name of the method is different from the name of the class. Aha, it says, this isn't a constructor since it doesn't have the same name as the class. So it must be an instance method. Hey, instance methods need a type! There's no type! Then it prints the error message.
Note that spelling errors include capitalization. So having a class named Dragon with a constructor called dragon() would cause the same error.
For more about constructor methods, see Multiple Constructor Methods.
The name of a constructor method is the same as the name of the class. For example, if we have a class named Dragon its constructor will be named Dragon as well:
public class Dragon{

  public Dragon(){
    super();
  }
}
There are a couple of things to notice here. One is that, unlike a regular method, the first character is upper-case, just like the class name. The constructor name must exactly match the class name. While it is only a convention that classes (and therefore, their constructor methods) start with a capital letter, it is an iron-clad requirement that the constructor name match the class name.
The other thing you'll want to notice is that there's no type given in the method declaration. A normal method (called an instance method, if we want to get formal) has a type provided in its declaration, just as a variable has a type in its declaration:
public void dragon(){ } // Instance Method.public int dragonCount; // Instance Variable.public class Dragon{ } // Class.public Dragon(){ } // Constructor.In the constructor's declaration, there's a scope called out (public) but no type. This is because, as a constructor for the object, it will be returning an object of the type it is a constructor for. OK, that sounds worse than it is. Let's try again...A Dragon constructor returns a Dragon object. A String constructor returns a String object. That's what it constructs, so that's what it returns. Declaring a type would be redundant:
public Dragon Dragon(){ } // This is NOT correct code, just an example of silliness!A Subtle Error
If you accidentally have a typo in your program that results in your class and constructor having different names, the compiler will complain that you've got a method without a type declaration. You'll look at the code and say "Hey! That's a constructor. It doesn't need a type declaration! What is my compiler smoking?"
public class Dragon{

 public Dragin(){
   super();
 }
}
Dragon.java:3: invalid method declaration; return type required
public Dragin(){
^
1 error
What's happening here is that the compiler sees that the name of the method is different from the name of the class. Aha, it says, this isn't a constructor since it doesn't have the same name as the class. So it must be an instance method. Hey, instance methods need a type! There's no type! Then it prints the error message.
Note that spelling errors include capitalization. So having a class named Dragon with a constructor called dragon() would cause the same error.
For more about constructor methods, see Multiple Constructor Methods.
Wednesday, July 2, 2008
A Most Basic Graphics App
Here's a simple graphics application in Java. It's about as simple as you can get while doing graphics.
Key points to note:
The line that reads g.drawLine(10,10,150,150); // Draw a line from (10,10) to (150,150) is the line that does the actual drawing. If you want to draw something else, or draw more things, replace this line with your own statements or add additional statements after this line. To see what you can do, check out the Graphics class in the Java API reference.
All of the items in blue,BasicPanel, need to match. You can just as well make it Foodle, but all of these need to match since this is the name of your class (and program.) Note that if you change it to Foodle, you need to save it in a file called Foodle.java, just as the file above needs to be saved in a file named BasicPanel.java
If you want to change the size of the window, change the 200,200 in the line reading frame.setSize(200,200); to some other number. Smaller numbers will make a smaller window, bigger numbers make a bigger window. The first number is how many pixels across it will be, the second number is how many pixels high it is.
Enjoy!
Technorati Profile
// Import the basic graphics classes.
import java.awt.*;
import javax.swing.*;

public class BasicPanel extends JPanel{

    // Create a constructor method
    public BasicPanel(){
        super();
    }

     public void paintComponent(Graphics g){
        g.drawLine(10,10,150,150); // Draw a line from (10,10) to (150,150)
    }

    public static void main(String arg[]){
        JFrame frame = new JFrame("BasicPanel");
        frame.setDefaultCloseOperation(JFrame.EXIT_ON_CLOSE);
        frame.setSize(200,200);

        BasicPanel panel = new BasicPanel();
        frame.setContentPane(panel);
        frame.setVisible(true);
    }
}
Key points to note:
The line that reads g.drawLine(10,10,150,150); // Draw a line from (10,10) to (150,150) is the line that does the actual drawing. If you want to draw something else, or draw more things, replace this line with your own statements or add additional statements after this line. To see what you can do, check out the Graphics class in the Java API reference.
All of the items in blue,BasicPanel, need to match. You can just as well make it Foodle, but all of these need to match since this is the name of your class (and program.) Note that if you change it to Foodle, you need to save it in a file called Foodle.java, just as the file above needs to be saved in a file named BasicPanel.java
If you want to change the size of the window, change the 200,200 in the line reading frame.setSize(200,200); to some other number. Smaller numbers will make a smaller window, bigger numbers make a bigger window. The first number is how many pixels across it will be, the second number is how many pixels high it is.
Enjoy!
Technorati Profile
The Basic Program Skeleton
The basic skeleton of a Java application goes as follows:
YourProgramName gets replaced by your actual program's name. The program must be stored in a file named YourProgramName.java
The actual code for your program goes in place of Your Program Goes Here.
More complicated programs have more to them than this. For example, you should have your own classes in their own files that contain most of your program logic if you are writing a long program. But this is the most direct and basic structure for a Java program.
The word arg can be whatever you choose to make it, by the way. If your program needs to get information from the system environment, just make sure that the name is the same as what you use in your program.
public class YourProgramName{
  public static void main(String arg[]){

    Your Program Goes Here

  }
}
YourProgramName gets replaced by your actual program's name. The program must be stored in a file named YourProgramName.java
The actual code for your program goes in place of Your Program Goes Here.
More complicated programs have more to them than this. For example, you should have your own classes in their own files that contain most of your program logic if you are writing a long program. But this is the most direct and basic structure for a Java program.
The word arg can be whatever you choose to make it, by the way. If your program needs to get information from the system environment, just make sure that the name is the same as what you use in your program.
Tuesday, July 1, 2008
Mini-Review: Beginning Programming in Java for the Absolute Beginner, 2nd edition, by John P. Flynt, Ph.D.

For non-programmers looking to make the transition to becoming a programmer, this book is a fine place to start. It works well as both a self-study text, and as a classroom textbook.
There aren't a lot of Java books out there written to teach the language to non-programmers. In many ways the Java language was created for C programmers, and most of the available books are written for the same audience--programmers familiar with C or C++. To my knowledge, there are presently only two books that are generally available intended to teach Java to the non-programmer. Edit: since this was written, several more books of this type have come out. The situation is far better now!
The First Step is Always the Hardest
As appropriate for a beginner's book, this book starts with a fair amount of detail on how to get set up and get started. It's challenging to strike the right balance with this material, some beginners get up and running with a minimum of effort, others run into trouble from unanticipated sources--leaving them in a position where almost no amount of information seems like enough. I think this book strikes a good balance, referring to external sources for supplemental material. Best of all, it maintains a platform-agnostic approach. You would think this is a given in a book teaching a platform-agnostic language, but it's not.
As appropriate for a beginner's book, the book teaches the principles of programming first, and Java second. The exercises of the seven chapters take the form of console, or command-line applications. Graphical applications are introduced about 2/3rds of the way through the book, in chapter 8. Most of the examples take the form of simple games.
The book teaches the basics of programming--variables, operators, flow control and such--in the first four chapters. The pacing of this material is very good, it teaches enough to not only cover the absolute core but some of the extra twists, and moves through it before it becomes tedious. Chapters five through seven get into object-oriented programming. The placement of this material in the book is great, going any further without introducing the material would be a bad idea, and any sooner would have been confusing to non-programmers.
Comprehensive Coverage
Overall the book covers a lot of ground. Someone working through this book from beginning to end is going to come out with a strong knowledge of a lot of Java. Each chapter ends with a number of exercises, which are essential additions to the examples in the text for the student to have the ability to really synthesize the information and go from program copier to a writing their own programs.
The breadth of the coverage is one of the books' strongest points. The material is well-paced, and the many complete examples of working programs are a huge advantage over the snippets that many books rely on. Exception handling, class creation, and many other subjects are covered. About the only thing I could ask for that isn't here is a brief introduction to threads, but I wouldn't even consider the idea of adding this if the book wasn't already so comprehensive.
Errata
One of the problems this book has is the typos in the program text. They are not numerous, and often even beginners can see the flaws once they know to look for them. They aren't common, only a few of the programs have errors in them. But they can be frustrating when they occur for those who are learning on their own.
Reaching Too Far?
Some of the examples try to do a bit too much, too. Rather than concentrating on one key point they add several new items at once. The centerpiece of each program is always the subject of the lesson, but additional little items get slipped into the examples. It's also worth noting that the examples that use special characters don't account for the configuration of the Terminal in Mac OS X that interferes with using these characters in the same fashion as on other platforms.
The later examples in the book also tend to get quite long. This results in a lot of typing by the beginner before they see any results. Likewise, this ties into the problem with many exercises not concentrating on the specific subject of the lesson. Particularly when graphics are introduced, I would have liked to see very short, focused examples that do only the absolute minimum to open a window and do some drawing, then add other interaction (such as the mouse, keyboard shortcuts, widgets, etc.) piecemeal. I ended up using my own example programs in my class to introduce graphics, and it went considerably smoother than I have had it go with students that followed the book alone. (I will be posting these examples in this blog when I get into graphics.) I would also like to have seen graphics introduced earlier in the book, allowing more examples to use graphics. This would also start the student making what look like "real applications" in the modern environment earlier in the learning process.
Summary
I feel this is a great book for a new programmer. Further, Java is a great language for a new programmer. Groovy may be better, but the resources available for a beginning programmer are still slim at this point, and I haven't actually had the experience of teaching it to beginners yet. Edit: There are many other languages that run on the JVM now, the others that can access the graphics and sound facilities natively (rather than through special calls to access Java syntax) would also be good candidates.
Final Grade: 85%, B
Pros:
Good material and pacing, (mostly) fun examples.
Covers lots of Java, and does it well.
Platform-agnostic.
Cons:
Typos in examples.
Discussion gets dry in places.
Examples in the later parts of the book are long and do too much at once.
Recommendation:
Buy if you're a non-programmer looking to become a programmer and want to do it with just one book. If you're willing to work out of more than one book, you may also want to consider Beginning Programming with Java for Dummies by Brad Burd (I'll be posting a mini-review of this book soon.) This also makes a good textbook for teachers looking for a class textbook thanks to the organization of the book and the chapter exercises.
Subscribe to:
Posts (Atom)