Showing posts with label video game. Show all posts

Monday, May 14, 2012

Java's Modulo Function--Wrapping Around

I've previously discussed operators in Java, where I gave a brief introduction to the modulo operator, %.

The percent sign is used in many computer languages as a brief, single-character symbol for the remainder of a division, not for a percentage of a number, as you might expect.

What's Left Over

In many calculations in normal day to day life, the remainder of a division is not very important. It's just the odd change left over at the end of doing division. With computer programs, however, modulos can be very useful and powerful.

One of its most important uses is to limit the range of a value. For example, if we're only interested in having a value be a number from 0 to 99, and any value over that is something we don't want, we can use modulo as a way of cutting any number we get down to size. Since the remainder of a division can never be as large or larger than the divisor, we know that any remainder from a division by 100 can never be more than 99 (in integers.) So we can take any number, find the modulo by some number that we want as an unreachable cap on our values, and never get a number that's too big.

limitedNumber = someNumber % 100

limitedNumber will never be higher than 99.

Real World Analogies

A real world version of this is a knob that you can turn around without a stop on it. The knob's setting can vary over a range of values all the way around it. But when you turn it past some point, it goes from its highest setting to its lowest setting.
Radio dial, image by John McComb of Oakland, CA.

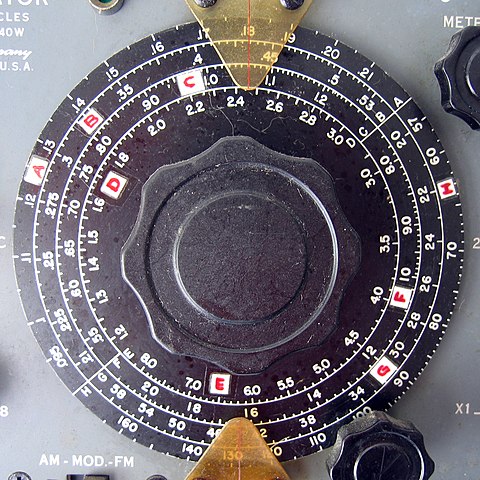
For example, a radio dial that goes up in frequency until you hit the top of the radio band, then starts tuning over again from the bottom of the band.

Computer Applications

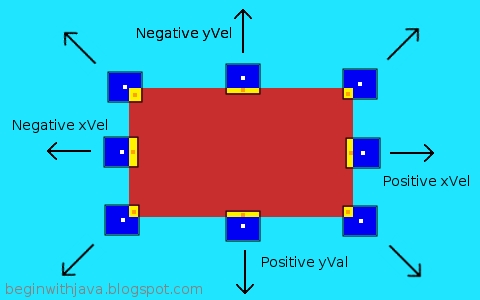
One of the most common uses of the modulo in computer programs uses that same ability with computer graphics. How many computer games have you seen where an object goes off one side of the computer's screen then reappears on the other side? That's an example of the modulo function. Let's look at an asteroid object that has its horizontal location on screen tracked by the member variable xLoc (short for x location):

Class Asteroid{
    int xLoc, yLoc, xSpeed, ySpeed, size;
    .
    .
    .
}


We'll assume the class has all the methods it needs to do what Asteroids do. Our instance is:

Asteroid asteroid = new Asteroid();
(If this is unfamiliar to you, you may want to read Creating a Java Variable, Two Steps.)

Now let's say our asteroid is presented on a screen area that is 800 pixels wide and 600 pixels high. That means our xLoc value can vary from 0 (the leftmost location on screen) to 799 (the rightmost location on screen) since we have a screen area 800 pixels wide. Remember, when we start counting at 0 our highest number is one less than the total number of pixels.

We can move our asteroid from left to right as follows:

xLoc = xLoc + xSpeed;

Where xSpeed is how fast we're moving across the screen.

The problem is, what do we do when we hit the right edge of the screen? That is, what do we do when xLoc is higher than 799?

If we want our asteroid to "wrap around" from the right side to the left side of our screen, the modulo operator is just what we want. We can do this to make it wrap around that way:

xLoc = xLoc + xSpeed;
xLoc = xLoc % 800; // Hard-coded screen width, for now.


That will make xLoc always be from 0 (when there is a zero remainder) to 799 (the highest possible remainder when dividing by 800.)

We might have a method in Asteroid like the following:

public int moveHoriz(int howFar){
  // Moves the Asteroid horizontally by howFar pixels on an 800 pixel wide screen.
  // returns the new pixel location.
  return (xLoc + howFar) % 800;
}


This glosses over a few other problems (like going from the left edge of the screen to the right), but illustrates the use of modulo to bring the object around from right to left again.


An Expanded Example

Here's a more developed example that deals with speeds higher than the screen width, and wraps both ways:

public int moveHoriz(int howFar){
  // Moves the Asteroid horizontally by howFar pixels on a screen.
  // It returns the new horizontal pixel location.

  // We have a screen width available to us in member variable xWidth,
  // and our x location in xLoc.
  // Wraps from right to left, or left to right.

  //Use modulo to trim speed if it's too high.
  if (howFar > xWidth) howFar %= xWidth;

  // Calculate the new x location and return it.
  return (xLoc + howFar + xWidth) % xWidth;
}


Radio Dial image by John McComb.
StumbleUpon

Thursday, October 20, 2011

Mobile Java

One of the nice things about Java is that is supported on more than desktop platforms, and has been for a long time. This means there is not only a large library of existing software, but also well-tuned development systems to use with mobile platforms.

By "mobile platform", I'm referring to smartphones and tablets. There are other mobile platforms, but these are the most common ones. Netbooks may also run a "mobile" operating system, or they may run a normal desktop OS. Those that run a normal desktop OS will run normal Java SE applications. Java SE is "Java, Standard Edition", the version that typically runs on a desktop or laptop computer.

Java ME is Java, Mobile Edition. It runs on most smartphones, and many tablets. It is very similar to the Java SE version covered in most of my articles. In fact, it is possible to write many applications using a subset of Java that will run without change under both Java SE and Java ME.

But normally a Java ME application will use user interface objects and interfaces that are specific to Java ME. In many ways these are more sophisticated than the ones for Java SE. Creating many types of graphical interfaces, such as tiled graphics, is easier in the mobile edition than in standard Java.

I have been writing small, simple applications for my cellphones for about ten years now. It's nice to be able to write your own little application for your own unique needs. I started writing Java applications for my Nokia 3650, called a "feature phone" at the time I got it. It was a Symbian Series 60 phone that ran an early version of Java ME with a very basic library of GUI features.

My next phone was a step up the Java ladder. It was a Sciphone G2, a fake Android phone. I didn't mind that it was "fake", it ran a real version of Java ME with updated GUI capabilities, which made it far easier to write applications for.

My current phone is a Blackberry Curve 8900. It runs Java ME with all the latest bells and whistles, plus a lot of Blackberry add-ons that make it easy to access the phone's features.

With my Nokia, I had a special Java development environment provided by Nokia that included a simulation of my phone, so that I could see how my programs would run before I put them on the phone. With the G2 I was on my own. I ran a standard Java ME development environment from within Eclipse, a great Java integrated development environment. The version linked above is a version specific to Java ME.

Now I'm back to having a development environment provided by my phone's maker. I have a program that simulates my phone on my computer, which again allows me to try out my programs before I put them on the phone (with my G2 I tested them as well as I could, then loaded them on the phone and hoped for the best.) It is build on Eclipse, so it is still very familiar. There is also a slew of information on the Blackberry site (linked above) about Java development.

Unfortunately, the tutorials on the site don't exactly match the actual current version of the software, but it's close enough it's not too hard to figure out. One thing that confused me, however, is the installation instructions. I thought I had to install the version of Eclipse they called for before installing the "Blackberry Java Eclipse Add-On". It's an add-on, right?

Well, it turns out that the "add-on" from Blackberry is actually the entire thing, Eclipse and all. So you just need to do that one download to get the development environment. Then download the simulator for your phone and any others you want to test your software on. Finally, apply for a signature key to make it so that you can "sign" your software to allow it to be installed on the phone through the software manager or Over The Air (OTA) when using the Blackberry-specific libraries.

If you'd rather not do this, you can develop software using a plain-jane version of Java ME, then transfer the software to your phone however you please. I put the software I developed for my Sciphone G2 on the memory card for my Blackberry, and it runs just fine.

Translating applications between Java SE and Java ME can be simple for ones with minimal amounts of graphics, like programs that mainly use text, buttons, and text entry boxes for communication. Things like games, with a more involved use of graphics, take more effort to translate between the two versions of Java. For these, I usually re-use the game logic code without changes, then rewrite the graphical display parts of the program from scratch. Because I use good object-oriented coding practices (most of the time), this isn't too much effort.

Java ME applets are easy to translate, though I write almost all of my Java software as applications now.
StumbleUpon

Thursday, September 2, 2010

Interactive Keyboard Input In Java: KeyListeners

In a console application, you can get keyboard input using the Scanner class, as described in Keyboard Input for Console Apps. In an graphical app, though, you can use one of the classes built to accept text input (e.g. TextArea or JTextField) or add code to your application to respond directly to the keyboard.

Keyboard input in the Java GUI made simple.
Playing with Today's Program

There are two basic ways of doing this. One is to set up Key Bindings, which maps keystrokes to actions in your application similar to accelerator keys or menu keyboard equivalents. The other is to use a Key Listener, similar to the Mouse Listener, which I detailed in Simple Mouse Interaction.

In this example we're going to use Key Listeners. There is less overhead to setting up a KeyListener when you just need to use a few keys. Key Bindings require more overhead to set up, but when you want to bind actions to a lot of different keystrokes, and manage the actions bound to particular keystrokes at a higher level, Key Bindings are better to use than a simple KeyListener.

As its name implies, a KeyListener is an Event Listener. If you're not sure what that is, read my article on Listeners or follow the prior link to Oracle/Sun's description.

Here's a program that demonstrates simple keyboard interaction. It's based on the MousePanel program I presented in Simple Mouse Interaction. It acts as a sort of "Etch-a-Sketch". You can download the KeyPanel program source from my Java code site.

// Import the basic necessary classes.
import java.awt.*;
import java.awt.event.*;
import javax.swing.*;

public class KeyPanel extends JPanel implements KeyListener{

public KeyPanel(){
super();
pointX=0;
pointY=0;
oldX=0;
oldY=0;
addKeyListener(this);
}

int pointX, pointY, oldX, oldY;
boolean erase;

public void paintComponent(Graphics g){
// Erase the board if it's been requested.
if (erase) {
g.clearRect(0, 0 , getBounds().width, getBounds().height);
erase = false; // We're done, turn off this flag now.
}

// Draw gray where the pointer was..
g.setColor(Color.GRAY);
g.fillRect(oldX-2, oldY-2, 4, 4);
// Draw "Cursor" at current location in black.
g.setColor(Color.BLACK);
g.fillRect(pointX-2,pointY-2, 4, 4);
}

public void keyPressed(KeyEvent key){

// Copy the last clicked location into the 'old' variables.
oldX=pointX;
oldY=pointY;
// Move the current point depending on which key was pressed.
if (key.getKeyCode() == key.VK_DOWN){
pointY=pointY+5;
if (pointY > getBounds().height){
pointY=getBounds().height;
}
}
if (key.getKeyCode() == key.VK_UP){
pointY=pointY-5;
if (pointY < 0){pointY=0;}
}
if (key.getKeyCode() == key.VK_LEFT){
pointX=pointX-5;
if (pointX < 0){pointX=0;}
}
if (key.getKeyCode() == key.VK_RIGHT){
pointX=pointX+5;
if (pointX > getBounds().width){
pointX=getBounds().width;
}
}

// Set a flag to erase the screen if Space is pressed.
if (key.getKeyCode() == key.VK_SPACE){
erase = true;
}


// Tell the panel that we need to redraw things.
repaint();
}

/* The following methods have to be here to comply
with the MouseListener interface, but we don't
use them, so their code blocks are empty. */
public void keyTyped(KeyEvent key){ }
public void keyReleased(KeyEvent key){ }

public static void main(String arg[]){
JFrame frame = new JFrame("Use Arrows to Draw, Space to Erase.");
frame.setDefaultCloseOperation(JFrame.EXIT_ON_CLOSE);
frame.setSize(640,480);

KeyPanel panel = new KeyPanel();
frame.setContentPane(panel);
frame.setVisible(true);

// We *must* do this to see KeyEvents.
panel.setFocusable(true);


// Initialize the drawing pointer.
panel.oldX=panel.getBounds().width/2;
panel.oldY=panel.getBounds().height/2;
panel.pointX=panel.oldX;
panel.pointY=panel.oldY;

}
}

Using this technique with the Simple Video Game Kernel would be similar. The VGKernel would extend KeyListener, register itself, and implement the KeyListener methods. But in those methods, rather than performing the operations that result from the keypress, as in this program, you would want to simply set a flag to show that the key has been pressed. Then, in your core game logic you would test to see whether the key has been pressed, and perform the appropriate actions.

That way the actions are performed at the appropriate time in your game, and not just whenever the key happens to get pressed. Reacting to a key when it is pressed is appropriate for a turn-based game, but not for a real-time game. In a real-time game the action happens according to the timing of the TimerTask that drives the game, which is why we just note that a key has been pressed, and wait until the TimerTask occurs to actually conduct the action related to that key. This would be similar to what we do with the space key here, which sets a flag to tell paintComponent() to erase the screen.

Give this program a try, see if you can extend it to allow the user to select colors to draw with or change the size of the drawing pen.
StumbleUpon

Tuesday, August 24, 2010

Using Game Controllers with Java

In the past, I've covered using mice as input devices, and covered the general input mechanism of Listeners. I've also discussed keyboard input for console applications, and I'll soon be covering Key Bindings as a way of using the keyboard in GUI applications.

But there's no facility in Java itself that deals with game pads easily. To date, it's been necessary to create your own ActionListeners from scratch. But not any more. Thanks to the JInput project, there's an easier way to hook up game controllers to your software.

JInput attempts to do discovery on your game controller, to figure out what its setting are, what buttons and controls it has, what the center positions are of analog sticks, and so on. All that messy stuff that makes rolling your own so darn painful. It's not 100% universal, but for most controllers and most games, it will do the job admirably. If you want better for a specific controller of your own, you can extend the classes to handle your stick (and maybe feed that information back to the JInput team so that they can decide whether to include it in future releases.

It's multi-platform, Windows, Mac OS X, and Linux. So it doesn't have the limitations of a lot of the other gamepad code implementations that use native code, thus limiting themselves to one platform (usually Windows.)

If you want to see an implementation using JInput, check out Greenfoot with Gamepads. It's a good, clear example of using JInput in a general fashion.
StumbleUpon

Sunday, August 22, 2010

More Collision Detection: Bouncing the Right Way

A common result of a collision between two objects in a video game is a bounce. To do this right, we have to know which direction to make things bounce. Here's one way to do that easily in Java. I've got a ball that's going to bounce in one of eight directions depending on how it hits a brick.

Diagram showing the results of a ball hitting a brick and bouncing, depending on how it strikes the brick. Collision detection in action.

I've marked the changes to the ball's velocity that will occur as a result of each possible type of collision. The three arrows on the left side all show that the xVel (x velocity) is a negative value, the three arrows on the bottom all show that yVel (y velocity) should become a positive value.

In the cases of the corners, both the x and y velocities are set. The bounces off the middles of the sides all cause one velocity to be set, but the other is left alone. For example, a bounce off the right side of the brick sets the xVel to a positive value, but the yVel is unchanged. So if yVel was a positive value before (meaning the ball is travelling down on screen) then it will keep travelling down. If it was negative--moving up--then it will keep moving up. Only the x direction of movement will change. It will start moving from left to right instead of right to left.

It's really easy to detect a collision, but now we need to know the relationship between the two colliding objects so that we can make the ball bounce in the correct direction. As we learned in Stopping Jonathan Livingston Seagull, the effect of how much we move an object before we check a collision can cause problems if we don't understand the limits of how we detect them.

In this program, our ball's movement is presently set at one quarter of its width. We could go as high as one half its width and still have our collision detection routines work properly here. Fortunately, we want to keep the distance the ball moves each turn short to make the movement look smoother.

When we hit the brick, we want to see where it hits the ball. This will tell the ball which way to bounce, just like a real ball. In the drawing above, we have a red brick on a cyan (blue-green) playfield. The ball is dark blue. Where the ball is intersecting, or overlapping, the brick is shown in yellow. Now we just need to know which side of the ball is getting "pushed in" this way. Then we bounce the opposite way.

Here's the program, the key code we're talking about is highlighted:
/* A simple video game style kernel, revision 4.
by Mark Graybill, August 2010
Has a ball bouncing off a brick.
Because the ball moves at a fixed speed,
slow enough we won't miss a collision,
we can use simple colliision detection.

Uses the Brick class from the article
"Multiple Constructor Methods"
*/

import java.util.*;
import java.awt.*;
import javax.swing.*;
import java.lang.Math;

public class VidBrick extends JPanel{

public Rectangle screen, bounds; // The screen area and boundary.
public JFrame frame; // A JFrame to put the graphics into.
public VGTimerTask vgTask; // The TimerTask that runs the game.
public VGBall ball; // The game ball, a subclass of Rectangle.
private Brick brick; // A brick for the ball to interact with.

/* This sets up the screen area, and creates instances of
the JFrame, VGBall, VGTimerTask, etc that we'll need. */
public VidBrick(){
super();
screen = new Rectangle(0, 0, 600, 400);
bounds = new Rectangle(0, 0, 600, 400); // Give some temporary values.
ball = new VGBall();
frame = new JFrame("VidBrick");
vgTask = new VGTimerTask();
brick = new Brick();
}

class VGTimerTask extends TimerTask{
public void run(){
ball.move();
frame.repaint();
}
}

class VGBall extends Rectangle{
int xVel, yVel; // The ball's velocity.
Color ballColor; // The color of the ball.

/* Create a VGBall with default location of upper left
corner, size of 20x20 pixels, moving at one quarter
its height and width per turn--plus it's blue. */
public VGBall(){
super(0, 0, 20, 20);
xVel = width/4;
yVel = height/4;
ballColor=new Color(0, 0, 128);
}

/* Move the Ball. */
public void move(){
// Move the ball according to the game rules.
x+=xVel; // Move horizontally.
y+=yVel; // Move vertically.

// Detect edges and bounce if necessary.
if (x > (bounds.width - width)){
xVel = -xVel; // reverse movement.
x = bounds.width - width; // Set location to screen edge.
}
if (y > (bounds.height - height)){
yVel = -yVel; // reverse movement.
y = bounds.height - height;
}
if (x <= 0) { xVel = -xVel; x = 0; }
if (y <= 0) { yVel = -yVel; y = 0; }

// Detect Brick and bounce if necessary.
if (intersects(brick)) {
// Get the intersection rectangle to find out which way to bounce.
Rectangle iRect = intersection(brick);
// If we hit on the left side, go left (negative x velocity).
if ((x+(width/2))<(iRect.x+(iRect.width/2))){xVel=(0-Math.abs(xVel));}
// If we hit on the right side, go right (positive x velocity).
if ((x+(width/2))>(iRect.x+(iRect.width/2))){xVel=Math.abs(xVel);}
// If we hit on the top, go up.
if ((y+(height/2))<(iRect.y+(iRect.height/2))){yVel=(0-Math.abs(yVel));}
// If we hit on the bottom, go down.
if ((y+(height/2))>(iRect.y+(iRect.height/2))){yVel=Math.abs(yVel);}
} // if intersects
}

/* Draw the ball into the provided graphics context. Preserves
the context's drawing color setting. */

public void draw(Graphics g){
// the ball draws itself in the graphics context given.
Color gcColor = g.getColor(); // Preserve the present color.
g.setColor(ballColor); // Use the ball's color for the ball.
g.fillRect(x, y, width, height); // Draw the ball.
g.setColor(gcColor); // Restore prior color.
} // end draw()
} // end of class VGBall

public void paintComponent(Graphics g){
// Get the drawing area bounds for game logic.
bounds = g.getClipBounds();
// Clear the drawing area.
g.clearRect(screen.x, screen.y, screen.width, screen.height);
// Draw the brick.
g.setColor(brick.getColor());
g.fillRect(brick.x, brick.y, brick.width, brick.height);
// Draw the ball.
ball.draw(g);
}

/* Main program loop. */
public static void main(String arg[]){

java.util.Timer vgTimer = new java.util.Timer(); // Create a Timer object
VidBrick panel = new VidBrick();

panel.frame.setDefaultCloseOperation(JFrame.EXIT_ON_CLOSE);
panel.frame.setSize(panel.screen.width, panel.screen.height);

panel.frame.setContentPane(panel);
panel.frame.setVisible(true);

// Set up the brick.
panel.brick.x = panel.screen.width/3;
panel.brick.y = panel.screen.height/3;
panel.brick.width = panel.screen.width/3;
panel.brick.height = panel.screen.height/3;

// Set up a timer to do the vgTask regularly.
vgTimer.schedule(panel.vgTask, 0, 33);
}
}

The way we figure out which way to bounce is to find the center of the ball and the center of the intersection rectangle (the yellow box in the picture, where the ball and the brick overlap.) Then if the center of the intersection (shown as an orange dot on the pic) is to the right of the center of the ball (a white dot) we bounce left. If it's to the left, we bounce right, if it's above we bounce down, below we bounce up.

This way we don't have to worry about the size or shape of the brick itself. All we care about is the bit that strikes the ball. Then the ball bounces the correct way.

If we had wanted to get really fancy, we could have made the ball bounce at different angles depending on the angle between the center of the ball and the center of the intersection rectangle. If you're familiar with trigonometry, take a look at the Math class in Java and see if you can implement this.
StumbleUpon

Friday, August 20, 2010

Web Browsing on the Atari 2600???

A recent discussion on an Astronomy forum took a turn for the earthly with the announcement of a new web site at StellarVue Telescopes. People were checking it out, reporting on minor fixes they felt were necessary and trying it with different systems and OSes. Then came the first report of a total crash and burn. From a Commodore 64 user. Next we had reports of failures on Heathkit and Vic-20 systems, too.

"Aha," I thought," a perfect opportunity to try out my Web Surfer cartridge on my Atari 2600!"

Here are the results:

My Atari 2600 with the Web Surfer Cartridge,
Displaying the
StellarVue Web Site.


Check out my Atari web page for more pictures and info on this amazing VCS cart!


Note to those following my Java Programming Stuff: I was supposed to post this over at my other blog, An Infinite Number of Cats on Keyboards, but I punched the wrong button on my Blogger Dashboard, and it ended up here instead. Sorry about that. Now back to our regularly scheduled Java program...

StumbleUpon

Sunday, August 15, 2010

Simple Collision Detection in Java

Collision detection is a basic element of a video game. It is one of the primary means of determining when objects in a game should interact. In Asteroids, there are collisions between the player's shot and the asteroids themselves. There are collisions between the player's shot and the alien spacecraft (hopefully.) There are collisions between the asteroids and the player's ship (argh!) Each of these is critical to the game.

Screen shot of collision detection in the video game kernel, showing color change of ball when intersecting the brick.

Since we don't have actual physics to determine when there's been a collision, as we have in real life, we need to create a set of rules for when a collision has occured then implement those rules in our code. One way to handle collision detection is to see if two potentially colliding objects intersect at all on the playfield. That is, whether one of them overlays the other.

Previously, we have worked with a simple video game kernel, then updated it to make the addition of game logic simpler. We had also created a Brick class that we can use to interact with the ball in our basic video game kernel.

Here is a slightly changed version of the simple video game kernel. It uses the Brick class, so Brick.class should be in the same directory as your VGBKernel.java and VGBKernel.class (it wouldn't be a bad idea to have Brick.java there, too, in case you want to play around with it at all to get different effects with this program through changes of your own.)
/* A simple video game style kernel, revision 3.
by Mark Graybill, August 2010
Uses an inner class to contain game logic,
with another inner class as a game timer.
*/

// Import Timer and other useful stuff:
import java.util.*;
// Import the basic graphics classes.
import java.awt.*;
import javax.swing.*;
import java.lang.Math;

public class VGBKernel extends JPanel{

public Rectangle screen, bounds; // The screen area and boundary.
public JFrame frame; // A JFrame to put the graphics into.
public VGTimerTask vgTask; // The TimerTask that runs the game.
public VGBall ball; // The game ball, a subclass of Rectangle.
private Brick brick; // A brick for the ball to interact with.

// Create a constructor method:
public VGBKernel(){
super();
screen = new Rectangle(0, 0, 600, 400);
bounds = new Rectangle(0, 0, 600, 400); // Give some temporary values.
ball = new VGBall();
frame = new JFrame("VGBKernel");
vgTask = new VGTimerTask();
brick = new Brick();
}

// Create an inner TimerTask class that has access to the
// members of the VGBKernel.
class VGTimerTask extends TimerTask{
public void run(){
ball.move();
frame.repaint();
}
}

// Create an inner VGBall class that has our game logic in it.
class VGBall extends Rectangle{
int xVel, yVel; // The ball's velocity.
Color ballColor; // The color of the ball.

public VGBall(){
super(0, 0, 20, 20);
xVel = width/4;
yVel = height/4;
ballColor=new Color(0, 0, 128);
}

// Instance methods for VGBall
public void move(){
// Move the ball according to the game rules.
x+=xVel; // Move horizontally.
y+=yVel; // Move vertically.
// Detect edges and bounce if necessary.
if (x > (bounds.width - width)){
xVel = -xVel; // reverse movement.
x = bounds.width - width; // Set location to screen edge.
}
if (y > (bounds.height - height)){
yVel = -yVel; // reverse movement.
y = bounds.height - height;
}
if (x <= 0) { xVel = -xVel; x = 0; }
if (y <= 0) { yVel = -yVel; y = 0; }

// Check for intersection with Brick,
// change color when touching.
if (intersects(brick)) { ballColor=Color.GREEN; }
else { ballColor=Color.BLUE; }

}

public void draw(Graphics g){
// the ball draws itself in the graphics context given.
Color gcColor = g.getColor(); // Preserve the present color.
g.setColor(ballColor); // Use the ball's color for the ball.
g.fillRect(x, y, width, height); // Draw the ball.
g.setColor(gcColor); // Restore prior color.
} // end draw()

} // end of class VGBall

// Now the instance methods:
public void paintComponent(Graphics g){
// Get the drawing area bounds for game logic.
bounds = g.getClipBounds();
// Clear the drawing area.
g.clearRect(screen.x, screen.y, screen.width, screen.height);
// Draw the brick.
g.setColor(brick.getColor());
g.fillRect(brick.x, brick.y, brick.width, brick.height);
// Draw the ball.
ball.draw(g);
}


public static void main(String arg[]){

java.util.Timer vgTimer = new java.util.Timer(); // Create a Timer object
VGBKernel panel = new VGBKernel();

panel.frame.setDefaultCloseOperation(JFrame.EXIT_ON_CLOSE);
panel.frame.setSize(panel.screen.width, panel.screen.height);

panel.frame.setContentPane(panel);
panel.frame.setVisible(true);

// Set up the brick.
panel.brick.x = panel.screen.width/4;
panel.brick.y = panel.screen.height/4;
panel.brick.width = panel.screen.width/2;
panel.brick.height = panel.screen.height/2;

// Set up a timer to do the vgTask regularly.
vgTimer.schedule(panel.vgTask, 0, 33);
}
}

The main changes here are the addition of the brick to the VGBKernel (that's why I renamed VGKernel to VGBKernel, by the way--it's now a Video Game Brick Kernel), and I've changed ball into an extension of Rectangle to make collision detection a bit easier.

To do the actual collision detection, I'm using the method intersects() from the Rectangle class. It tests whether one Rectangle overlaps another in the coordinate space.

In this case, if the ball is on top of the brick (a rather large brick), then the ball turns green. I could have had any of a number of other effects. For example, when I was first testing this routine I didn't change the color of the ball, instead I had the ball send a message to the Java console that read "Ow!". So whenever the ball passed over the brick I'd get a long string of messages in the console like this:

Ow!
Ow!
Ow!
Ow!
Ow!
Ow!
Ow!
Ow!
Ow!

I could just as well have the program play a sound, draw an image, update a score, or any of a number of different things when a collision occurs. Exactly what should happen is determined by the rules of the video game itself.

Going Further

Try changing the effect when the ball strikes the brick. The easiest place to start would be making the ball a different color than green. To get more sophisticated, try things like adding a sound, or counting the number of moves that the ball is in contact with the brick. Change the size and location of the brick. Perhaps try adding additional bricks, and have each create a different effect. Try changing the color of the brick when the ball strikes it.

One thing about the collision detection we are doing here. It only detects when we have actually started to overlap with the brick. In many cases, it's desirable to predict when a collision will occur as a result of a move before that move occurs. Try to develop a solution to this yourself. I'll be addressing this in a future article, so you can compare what you came up with against my method. Remember that in programming there's almost never just one way to accomplish something. The same effect can usually be produced any of a number of different ways effectively enough to use in a finished program.
StumbleUpon

Monday, August 9, 2010

Java Video Game Programming: Game Logic

The simple video game kernel I presented earlier is a good start, but some compromises were made to make it as simple as possible. Now we're going to start adding back some of the complexity to give us more control over what we can do with it.

The first step is to make the game's ball a real object, rather than some variables within our JFrame.

In simple video games, there is usually some object in the game that does most of the "thinking" with respect to the game's rules. In a game like Pong or Breakout, the ball does most of the "thinking". The paddles move according to user input, but they don't really need to know if they've collided with anything in the game (their own logic keeps them from moving off the playfield.) The bricks don't need to know anything about what's going on, they just need to hang around, then disappear when something tells them to, and perhaps return some information about what score they're worth, if there are different scores for hitting different bricks.

The ball, however, is a more active participant in the game. It needs to know about collisions, respond to the other objects in the game, and generally know what's going on. In other words, it is the object that keeps track of most of the game rules. In a video game, this is referred to as the game logic.


A bouncing ball in the simple Java video game kernel program.

This simple kernel improves on the original. Turn it into your own Pong, Breakout, or Tank clone.

In the example below I've made a Ball class. This is where most of the game's logic will reside. Here it is in the ball's move() method. Since the ball will need access to inside information about the playfield and the objects on it, I've made it an inner class of the playfield's class (VGKernel.) As an inner class, it has access to all of VGKernel's members and methods as if it owned them itself. This simplifies the program a lot.

Here is the modified version of the video game kernel. Changes from the original have been highlighted:
/* A simple video game style kernel, revision 2.
   by Mark Graybill, August 2010
   Uses an inner class to contain game logic,
   with another inner class as a game timer.
*/

// Import Timer and other useful stuff:
import java.util.*;
// Import the basic graphics classes.
import java.awt.*;
import javax.swing.*;
import java.lang.Math;

public class VGKernel extends JPanel{

// This is not a recommended coding practice, just a shortcut.
public Rectangle screen, bounds; // The screen area and boundary.
public JFrame frame; // A JFrame to put the graphics into.
public VGTimerTask vgTask; // The TimerTask that runs the game.
public VGBall ball; // The game ball.
// Create a constructor method:
  public VGKernel(){
    super();
    screen = new Rectangle(0, 0, 600, 400);
    bounds = new Rectangle(0, 0, 600, 400); // Give some temporary values.
    ball = new VGBall();
    frame = new JFrame("VGKernel");
    vgTask = new VGTimerTask();
}

  // Create an inner TimerTask class that has access to the
  // members of the VGKernel.
  class VGTimerTask extends TimerTask{
    public void run(){
      ball.move();
      frame.repaint();
    }
  }

  // Create an inner VGBall class that has our game logic in it.
  class VGBall{
    // Accessor methods would be more proper,
    // but for now I just make the needed variables public.
    public int x, y, width, height; // Ball's location and size.
    int xVel, yVel; // The ball's velocity.

    public VGBall(){
      x = 0;
      y = 0;
      width = 20;
      height = 20;
      xVel = width/4;
      yVel = height/4;
    }
    // Instance methods for VGBall
    public void move(){
      // Move the ball according to the game rules.
      x+=xVel; // Move horizontally.
      y+=yVel; // Move vertically.
      // Detect edges and bounce if necessary.
      if (x > (bounds.width - width)){
        xVel = -xVel; // reverse movement.
        x = bounds.width -  width; // Set location to screen edge.
      }
      if (y > (bounds.height - height)){
        yVel = -yVel; // reverse movement.
        y = bounds.height - height;
      }
      if (x <= 0) { xVel = -xVel; x = 0; }
      if (y <= 0) { yVel = -yVel; y = 0; }
    }
  } // end of class VGBall

// Now the instance methods:
  public void paintComponent(Graphics g){
    // Get the drawing area bounds for game logic.
    bounds = g.getClipBounds();
    // Clear the drawing area, then draw the ball.
    g.clearRect(screen.x, screen.y, screen.width, screen.height);
    g.fillRect(ball.x, ball.y, ball.width, ball.height);
  }

  public static void main(String arg[]){

    java.util.Timer vgTimer = new java.util.Timer();  // Create a Timer object
    VGKernel panel = new VGKernel(); 
    
    panel.frame.setDefaultCloseOperation(JFrame.EXIT_ON_CLOSE);
    panel.frame.setSize(panel.screen.width, panel.screen.height);

    panel.frame.setContentPane(panel); 
    panel.frame.setVisible(true);

    // Set up a timer to do the vgTask regularly.
    vgTimer.schedule(panel.vgTask, 0, 33);
  }
}
Now the ball not only is its own class, it has a more sophisticated means of keeping track of its direction of movement (xVel and yVel, tracking velocity as a positive or negative value, as opposed to the simple right and down booleans in the original.) This means that logic in the game could vary the velocity of the ball easily, as well as change its direction of movement.

Other objects on the playfield should be defined in their own classes, outside VGKernel. This will keep VGKernel from becoming too long and from making the program too monolithic and difficult to maintain.

Simple exercises:
Since the ball has access to VGKernel's members, including the drawing screen, the ball can be made to draw itself. By giving the ball its own draw() method, we can make it easier to change the appearance of the ball at will. Give it a try.
StumbleUpon